Ever wanted to play a game of Armada solo? This system can allow you do do that!
11/01/2021 Update: Rules Reference PDF created!
1/10/2021 Update : The Clone Wars brought us an updated ruleset. Added new rules for Pass Tokens, Command Driven Abilities, and Consuming Tokens. Also included Elastic Clause.
3/21/2020 Update: Wave 8 has introduced a new defense token, Salvo. I have updated the rules to simply reflect that AI ships with salvo, ALWAYS use Salvo, in addition to ONE additional defense token.
All you need to get started is the AI deck which can be found here.
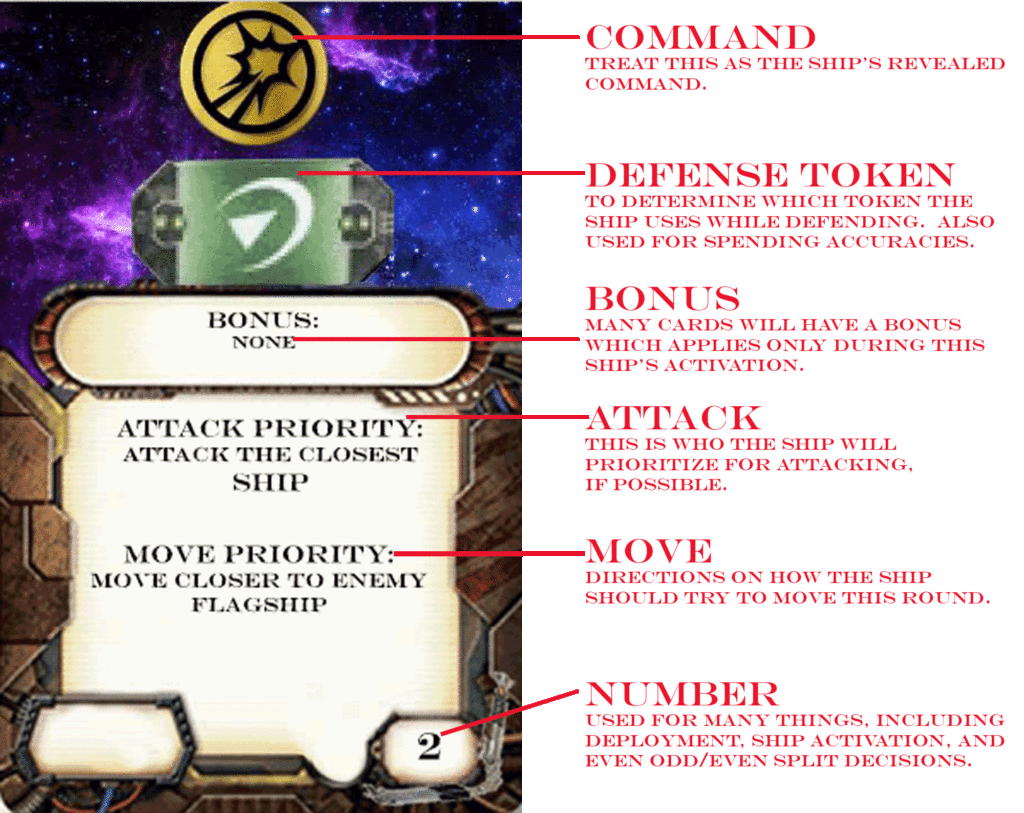
The Deck is going to be used for almost everything. It will determine which ship the AI Activates. It will determine which command the AI has selected. It will determine which Defense token the AI uses. It will determine both attack priority, and movement priority. It will also help decide any choices the AI player must “Choose”.
The Basic Rules:
Setup:When building forces, it is best to give the AI a 50 point handicap, (so 400 vs 450 for example), but this is up to the player. It is a sliding scale of difficulty, so a more experienced player could play against a higher handicap or even make forces even, if a player is newer.
The Human player will always be 1st player. There are currently no objectives for this AI system. (Think of the handicap as the objective). Setup however, follows the normal rules with these changes:
When the AI player would place an obstacle, they draw two cards. They then line the obstacle up with the first card’s number, and the second card’s token. According to this deployment chart. Notice a range ruler placer against the center of the map, is used to determine the number of the horizontal axis, with everything to the left of the left “5” being marked as “1”, and everything to the right of the right “5” considered “12”. This will provide a general area of where to place the obstacle. If the obstacle cannot be placed, (perhaps being too close to other obstacles), then simply draw 2 more cards and try again.

For deploying AI ships, simply follow the same chart, placing ships as far forward as possible, while also being pointed generally towards the enemy fleet. If the human fleet is spread apart, point the AI ship generally toward the largest grouping of ships. To determine WHICH ship to deploy, simply mark each ship with a number before the game, and draw cards from the deck until you get a number that is available for deployment. You will use this same numbering system for ship activation as well. In the rare case an AI fleet has more than 12 ships, simply deploy 13 and on, after all of 1-12 are done. All AI ships deploy at speed 2. (If speed 2 is otherwise not available, select the highest speed it can go).
The AI will deploy squadrons once it has deployed it’s ship with the largest squadron value. In case of a tie, use the first ship that is tied for highest squadron value. They will place them farther forward, but generally not directly in the path that the ship expects to go. All Squadrons will be placed within range 1-2 of the same ship. If there is not enough room, they will place an additional ship before resuming squadron placement and place them within range of the next ship. Once all AI Squadrons have been placed, (Or only 1 remains), then they will proceed to place remaining ships.
Thematic Setup: Alternatively, you can set up the obstacles and enemy ships in a more challenging way, to save time and present a more realistic setup.
Gameplay Principles : The AI will always follow certain principles.
Closest: All things considered, the AI’s choices will always go to which option is closest, when applicable and unless it is directed otherwise.
Biggest First: when the AI has multiple choices that are otherwise equal, they will choose the largest option first. If there are two attacks to be made, they’ll use the larger dice pool first.
Triggers: The AI will trigger any optional abilities at the first opportunity that they are going to fully work. For example, a ship equipped with Turbolaser Reroute Circuits, that also has two shots, will always use them on the first shot. Unless however, all dice are already doubled (Even if a crit might be preferable).
Clockwise Principle : Decisions that involve a hull zone will be settled by choosing the Front zone first, and then the Right hull zone second, then Rear, and finally, left.
Using the AI Deck:
When it’s the AI player’s turn, first, determine is the AI will Pass or not, (See below), then if you are going to activate a ship, flip cards until you come to a ship number that has not yet activated. The chosen ship is now activated.
(Passing) – The AI will not pass at all during the 1st turn – however during rounds 2 and 3, the AI will pass as often as possible, until it runs out of tokens, according to the Rules Reference Guide. Then, from turn 4 and beyond, the AI will no longer pass. If the AI still has tokens remaining, it will ignore them.
Re-Shuffle the deck and pull the top card. This is now the card that will apply to the ship’s activation. You’ll now set the ship’s Command Dial to the command on the card. If you CAN NOT use the command to any benefit, then take a token. Examples would be Engineering if you are 100% full, or Concentrate Fire when there is no target to attack. Ignore the Defense Token for now. Also take note of any Bonus effects in the Bonus category – they will only be active during this ship’s activation. AI Ships will attempt to use all tokens they have, every turn – if there is benefit.
Attack – The AI will always spend any option attack effects on the FIRST attack, and will almost always use their arc with the most dice, first. That being said, the Attack Priority will guide the ship on what to attack. If it cannot meet it’s attack priority, it will prioritize Ships first, and Squadrons last. If a ship can fire at multiple ships, let the closest ship be the tie breaker. If a ship has reroll abilities it will only reroll blank dice. Any accuracies will be spent to target available defense tokens. To decide which, simply reveal cards from the top of the deck until you reveal a card with a defense token that the defender has. Then target that one. The AI will prioritize green tokens over orange, exhausted tokens.
Movement – The TOP priority for AI Movement is to NOT fly off the map. The Second priority is to avoid ramming friendly ships. This, while second, is often the first priority to actually consider. Third in priority is to consult the Movement Priority category on the ship’s revealed AI Card, and attempt to move in a way in accordance with that guidance. Finally, the ship will attempt to avoid debris clouds and asteroid fields. If the ship has a NAV command It will attempt to adjust speed to best meet all 4 of these goals. Navigation does require a bit of work by the player, and it is best if you try to keep this guidance and keep the spirit of how an opponent would fly against you, with this guidance.
Defending – In Addition to ALWAYS using Salvo if is able to be used, the AI will only ever use ONE additional defense token, and you will simply reveal cards from the top of the deck until you find one that matches an available token. If there are multiple choices, (2 Redirects for example) the AI will prefer one that is sustainable, so perhaps a green redirect over an exhausted redirect. If both are exhausted however, the AI will permanently spend it if possible.
Command Driven Abilities – If the AI has upgrades that trigger based on a certain command type the AI will now have “Priority” for that command, which means the AI has additional opportunity to use that command. If the first card you pull is not the Priority command, discard it and pull again. If the new card is not the priority command, simply use the 2nd card.
If an AI has multiple command driven abilities, it does NOT gain the benefit of “Priority”. As such, it is better to build ships for AI that all utilize a single command driven ability.
Upgrades that consume tokens- A ship will feed tokens to its upgrades according to these rules –
If there are multiple upgrades that want the same token, the token will go toward the more expensive upgrade. If it’s still a tie you can randomly decide via a coin flip or pulling cards (Odd/Even).
After that, if any cards have tokens built into their own card, they can spend those to “Ready” themselves or otherwise pay costs associated with their card’s abilities.
Finally, any other cases may occur, such as an upgrade that allows you to spend tokens from nearby ships – resolve these in order of which ship is closest first.
Squadrons – Squadrons always target enemy squadrons first, and ships last. They’ll always shoot first if possible, and will shoot whoever is closest first, (keeping in mind Escort and other abilities that impact targeting). AI Squadrons will move as close as they can to the nearest enemy squadron, if they can engage it. If a squadron can NOT engage enemy squadrons in a single move, they’ll attempt to shoot, and or move to a ship matching their activating ship’s targeting priority. If there IS no activating ship, (Squadron phase) then they’ll just focus the closest ship.
Commands – How to resolve each command.
Concentrate Fire – Add one die to the first attack made, prioritizing Black dice first, then Blue, and finally Red. If there are no shots, simply take a token. If the ship has a token it’ll spend it to reroll a blank die, prioritizing a blank black first, and a red die second. If the ship has ONLY blue dice, it will only reroll accuracy results if all results are accuracies.
Squadron – The ship activates squadrons up to it’s value, starting from closest friendly squadron, to furthest. Activated squadrons follow normal squadron rules, prioritizing enemy squadrons first if possible, and if not, prioritizing the parent ship’s target. If they cannot fire on any targets they’ll simply move at maximum speed to the closest target.
Engineering – If the ship cannot spend all available Engineering points, (Only 1 shield lost on an ISD perhaps), it will take a token. The only exception is if it has a matching token already. Priority for engineering points are: Faceup Damage, Face Down Damage, and then Shields. Shields are restored using the clockwise principle. 1st shield goes to the front arc, and the 2nd goes to the right, if applicable – and so on and so forth. This also applies to ANY time shields are restored.
Navigation – For Navigation, consult the card’s movement priority. If it says “Slow Approach”, you’ll keep the command and reduce speed to a minimum of 1. If it says “Speed up”, you’ll keep the command and speed up. This also applies if you have a Nav token. Clicks can be taken at the user’s discretion to help meet movement criteria and priority. If the ship will require clicks to maintain its movement goals, it may also keep the command.
Excess Tokens – If a ship has a command it cannot use and also has its maximum number of tokens, it will always take a token of the new type. To determine which token gets discarded to make room, simply reveal cards from the top of the deck until you find a matching result.
Upgrades – How to deal with them.
Most upgrades will be self explanatory but for all the rest, we’ll try to abide by a few general principles.
Use as early as there is full benefit – A card like Reinforced Blast Doors repairs 3 damage cards. The AI won’t use this until it has at least 3 damage cards to repair.
Rerolls – Cards that allow you to reroll will trigger any time you have blank dice, and ONLY blank dice will be rerolled. Alternatively, cards that force an opponent to reroll will Prioritize: Black Crits, Red Doubles, and finally Blue Crits. Anything else does not get forced to be rerolled.
Odd or Even – If it’s ever unclear weather or not to use an upgrade, (Lando Officer perhaps when it’s high, but not lethal damage) simply draw the top card. If the card is Odd, then Yes, you use it. If the card is Even, then No, don’t use it.
Elastic Clause (Optional Rule) – If the AI would do something that is clearly a BAD choice – you can override the decision and make a more tactical choice. You can do this up to 3 times per game.
The Golden Rule – The entire project is meant to be fun. If you run into a situation that there’s no answer for, try and resolve it in a fun way that makes sense and feels right. Best of all, tell me about it!