New player looking to get started in Star Wars Legion? Or just looking to grow your collection? In this series of videos, recently updated for 2022, I will cover the basics of what to buy first, when on a budget for Star Wars Legion – sorted by faction!
Naturally you’ll want to pick a faction first – so weather you prefer the Rebels, The Empire, The Galactic Republic, or the Separatist Alliance, there’ s a guide below for you!
Empire
Rebels
Republic
Separatists
Hope these help! If you have further questions, don’t forget to join our Discord here!
Managed to get a Legion AT Battle in the other day!
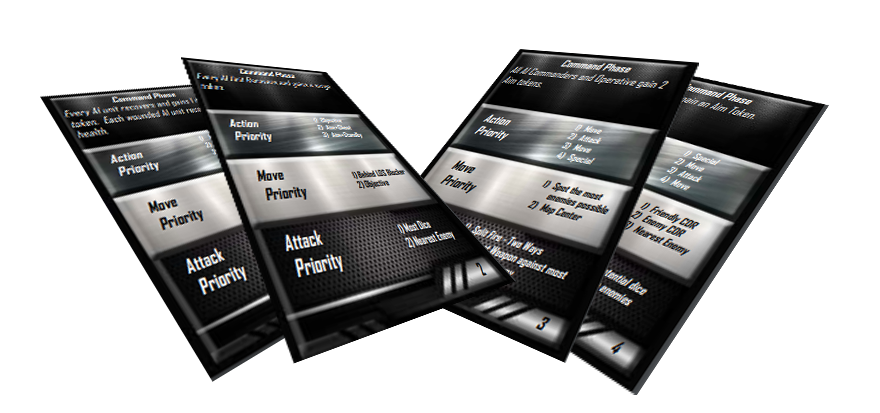
If you haven’t already, check out the AI system that is available for free here! It’s not meant to be exactly the same as a human opponent, but will certainly give you the chance to try some lists out when you can’t play with another person face to face!
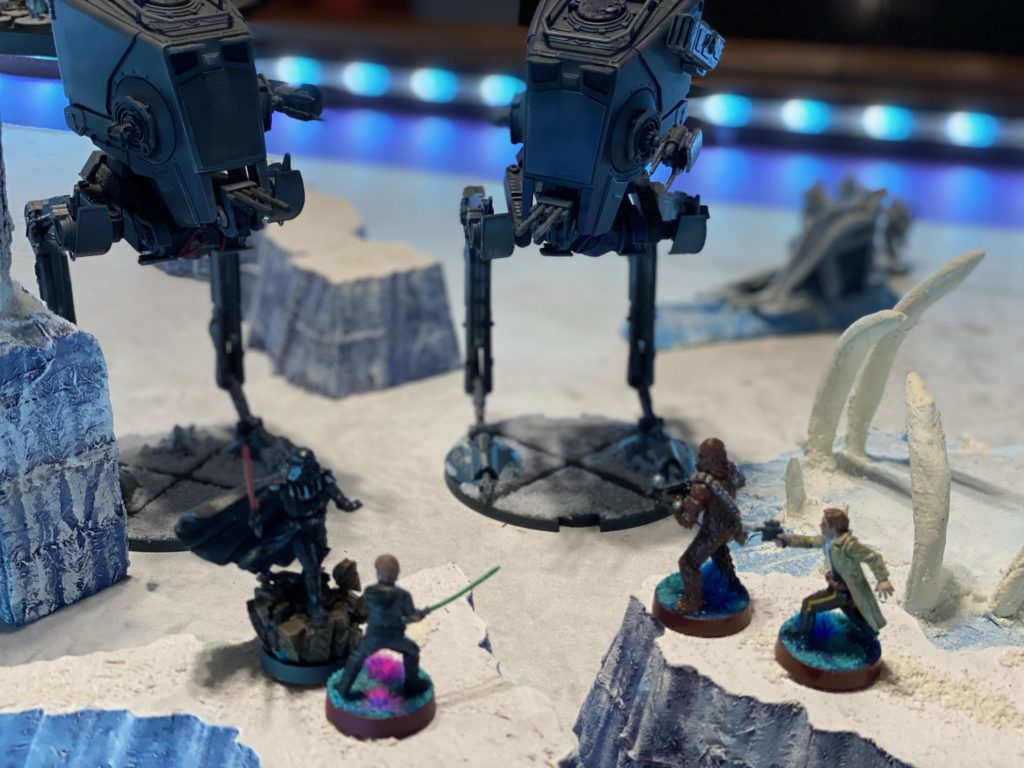
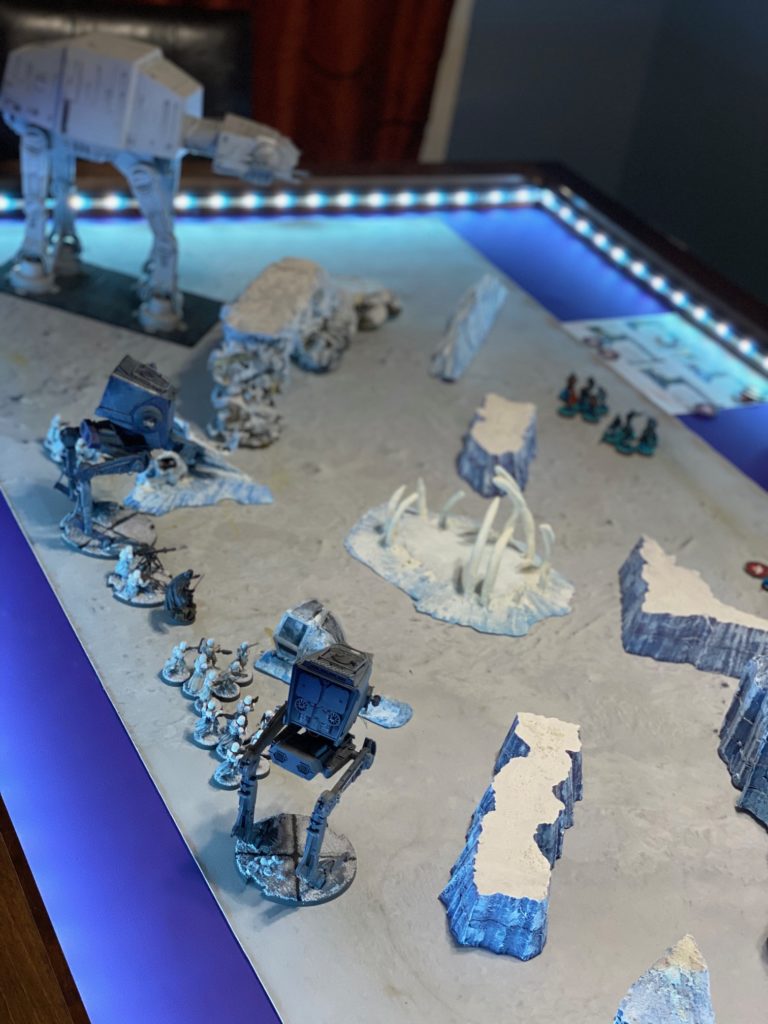
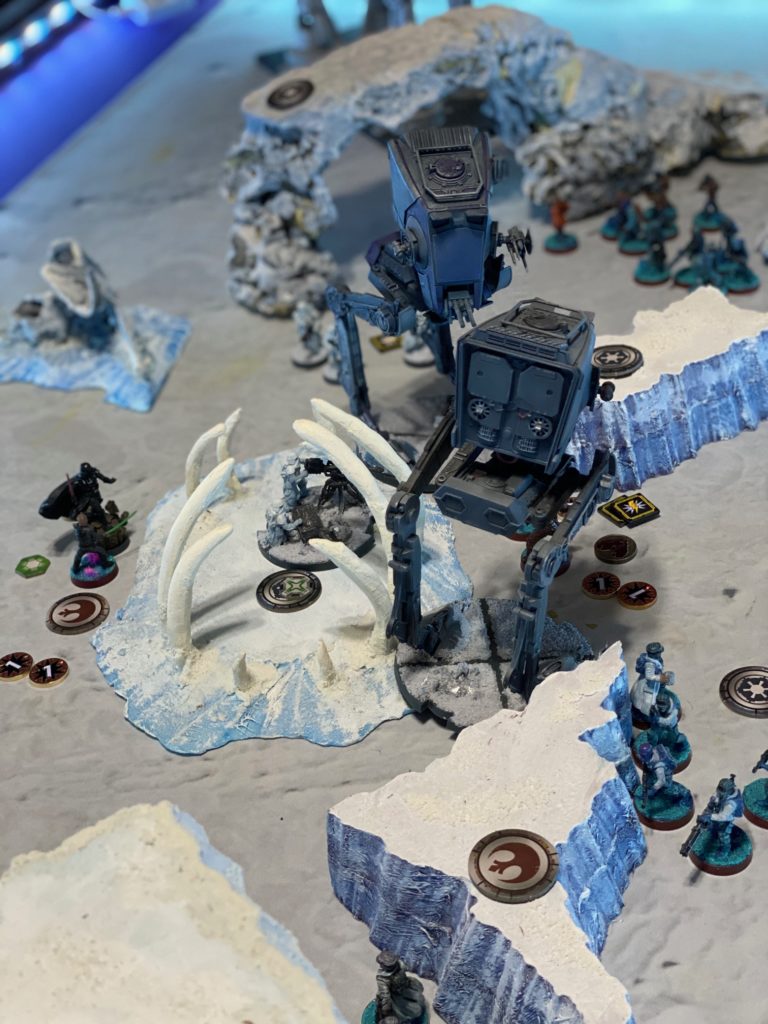
I set up a double AT-ST list for the AI to use against my Rebel hero list! I gave the Imperials an extra 100 points since they had Vader as their commander. It was very Hoth inspired.
The AI instructed the AT-ST’s to move a bit more than I might have otherwise done if I was in control of them, but that also put them closer to my deployment zone, and it was breakthrough so that’s where they eventually wanted to be.
It was a fun battle – here’s a link to the entire thing!
Return of the Jedi. The third Star Wars film, yet the sixth Episode in the Skywalker Saga. My favorite Star Wars movie hands down… mostly because it was the first one I have coherent memories of.
It also happens to be the subject of our sixth episode of Double Critical – where Sean and I take another look at this movie and try to decide what from this movie could still come to Star Wars Legion.
I also noticed some interesting things during yet another watching of this movie – notable how Luke is incredibly aggressive in this film, breaking into Jabba’s Palace, using force choke, and trying to murder Jabba in his own home… we talk about this and more in Episode 6!
While I’d have liked to test it a bit more before release, I figured this was a really good time to finally release my Legion AI v1.0 so everyone can have some fun playing legion at home!
With a growing focus on tabletop terrain for both Legion and RPG needs, I’ve been always on the lookout for new terrain to review. Having worked with LV-427 Designs before, I was delighted to see their re-designed modular corridors, which are now larger and more compatible with games like Legion than before!
The Hangar Bay is perfect for a large battle inside a Star Destroyer, or even the Death Star!
The Hangar Bay was the first or the new large rooms that I’ve seen. I was really excited to see rooms of this size because the first time I saw their terrain it was primarily corridors and smaller rooms, which work great for the RPG, but not as good for Legion. Larger rooms make it easier to fit and move larger units around the game board!
Hibernation Chamber and Conference Room are both a real delight!
The Hibernation Chamber and Conference room each feature a series of 4 interconnected tiles to make one large room. They each also have a removable centerpiece, helping make them versatile and perfect for both role play functions and also for battling inside a station or destroyer!
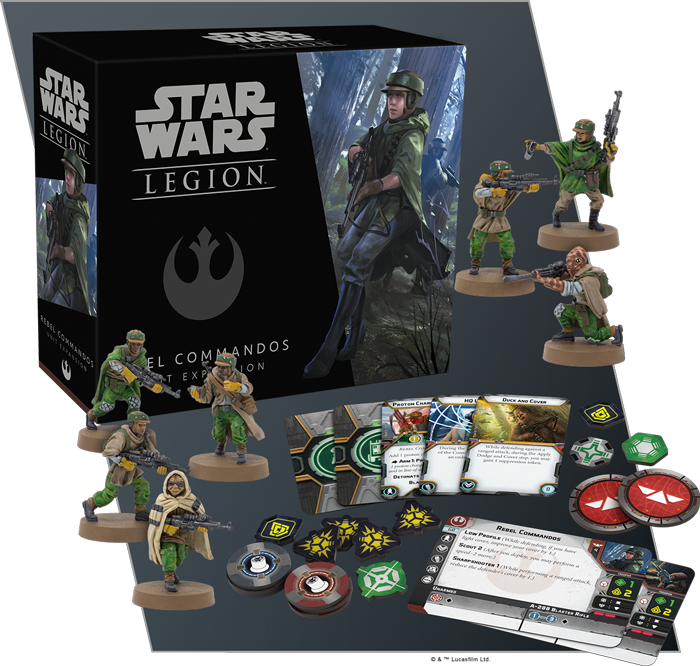
Now that the Rebel Commandos have arrived in Legion, you may be wondering how to best use these new versatile Special Forces units, especially since this is the first expansion pack to offer two units for the price of one! Lets break down the ways you can run them and which ways work best.
The Heavy Weapons
These are what make this unit shine. The DH-447 Sniper has unlimited range, pierce 1, and two dice ( albeit one of them is white). It also has High Velocity, which if it’s the only weapon in the attack pool, the defender can’t spend dodge tokens. It’s VERY likely to do damage, but only a little.
The Proton Charge Saboteur is the answer to swarm lists. Now finally, your opponent may have to think twice about grouping up 6 units of Corps close together! This unit can Arm a proton charge as an action, which places a charge within range. When detonated, these charges will make a ranged attack against EVERY unit at range 1 of it, one at a time. This is tremendous for multiple reasons, which include damaging groups of enemies, dealing out loads of suppression, and even hurting vehicles! The attack itself , which consists of one red die and two white, has Blast, Impact 1, and it’s own special Surge to Crit! Each Saboteur has Detonate : 1, which allows them to trigger ONE charge to detonate after ANY unit takes an action. This means, you can drop a mine, move out, and trigger your charge after you move. This also means you can run in, drop a charge, and immediately blow it, potentially hurting yourself! It could be dangerous doing the latter, but if that means you can hit 3 enemy units? It just might be worth it!
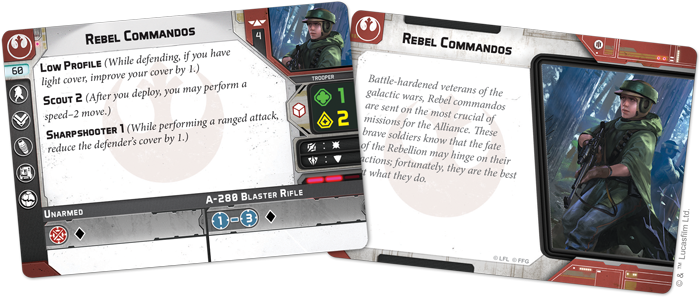
The Basic Unit
One of the first thing’s you’re going to notice, is the lack of a personnel upgrade, which means you aren’t going to be able to outfit this unit with six miniatures, so five will be your limit if you use a Heavy Weapons miniature. In addition, we get Comms, Gear, Grenades, and a new upgrade called Training, which isn’t half bad considering that we get Duck and Cover with this wave. As far as the rest of the stats, they are largely similar to the typical Rebel Troopers, with a few key upgrades (which help, considering they cost an extra 20 points). So what do we gain for those extra 20 points?
First off, these Commandos have both offensive and defensive surge, which is pretty nice to start. Additionally they have a courage value of 2, which helps them still get two actions even when they have a suppression token. It also makes them a decent commander if your commander should die. Their keywords however are especially helpful. Low Profile means you may seriously want to consider always running Duck and Cover. Scout 2 is incredible for early game positioning and objective play. Sharpshooter 1 is just all around good, though generally it lends itself to doubling up fire on a unit that’s already been shot and now has suppression, snipers, or both.
The Commandos are an all around solid unit – but you may not want to run them without a heavy weapons upgrade. Running them with only 4 miniatures can work if you’re looking for some quality trooper units for your build, but generally you’ll probably want to run some heavy weapons units. Before we talk Builds, let’s look at the Strike Team.
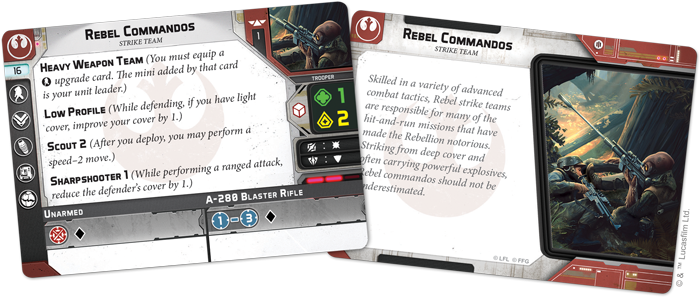
The Strike Team
The Strike Team is almost identical to the standard Rebel Commandos card, with three key differences. First, the cost, which is only a mere 16 points! Second, the miniature count is only 1. Lastly, the keyword “Heavy Weapon Team”, which forces you to take a heavy weapons upgrade, which then becomes the unit leader.
The Strike Team is an ideal way to inflate your unit count, considering that a Strike Team can be as cheap as 42 or 44 points, depending on which Heavy Weapons option you select. For players who want to push the limits of units in a list for things like activation advantage, the Strike Team will prove an effective way to pad your activations, while also giving you some excellent tricks.
Which Configuration is Best?
For starters, I will suggest using the Sniper in a Strike Team, and the Saboteur with a full unit. This way you can have two distinct Special Forces units in the same list, with only a single expansion box. Other options certainly work, but not everyone will want to buy 3 boxes of commandos to try every permutation.
Snipers
Snipers work VERY well with a Strike Team. Having only 2 miniatures, gives them easier access to be deployed on smaller, narrow ledges. Additionally, camping a sniper in the corner of a map, often means the rest of the commandos are NOT firing their weapons. A Strike Team minimizes this by having only one miniature sitting around doing nothing.
Snipers don’t work as well in the full Commando Unit, because that generally tends to mean that you bring them into the battlefield, putting them within range 3 of enemy units, which someone diminishes their value a bit. However, it does allow you to more easily split fire, dealing out suppression, or combining the sniper’s weapon to give your larger attack Pierce 1. One other option is also to simply be a strong Counter-Sniper unit. A Five-Person sniper unit is much less likely to die from opposing sniper fire.
Saboteurs
The Saboteurs work a little better in a full unit, as they are more likely to want to get down into the middle of the battlefield and mine the heck out of it. Having additional miniatures also means that the saboteur has a longer lifespan, and thus, can survive longer. Don’t forget, your Saboteurs need to be alive in order to trigger “Detonate”. When your last saboteur dies, the rest of your charges can no longer be triggered.
The Saboteurs CAN also work well as a Strike Team, but this is one of those cases where I would advise to run more than just one. Strike Teams are cheaper, and that means more Saboteurs, and thus, more charges placed all over the battlefield. You could in theory place a maximum of 18 charges in a single game with three Saboteurs, and although that certainly won’t always be the case… being able to place several near key objectives is amazing. The other advantage of having multiple saboteurs is that you’ll have multiple instances of Detonate. It’s partially about redundancy, in that losing one saboteur will still allow you to trigger charges, but it’s also about having the ability to trigger more than one at a time. Blowing 3 charges when an AT-ST steps too close, and taking it from 6 health to dead in a single move… is really satisfying!
In Closing
These Heavy Weapon units really help make the Commandos Shine – so weather you’re trying to snipe, mine, or simply use the commando’s regular weapon to actually shoot enemies within range 3 – it’s gonna be a great time! Imperial Scouts will likely behave in a very similar fashion in terms of teams and pairings. Once those come in both sides will finally have Special Forces!
If you are in the market to upgrade your tabletop gaming experience than you absolutely need to check out some of these amazing terrain pieces from Imperial Terrain. They were kind enough to send over a few for me to look at and I’ve got to admit that I’m pretty blown away. The detail on these pieces are extremely high, and all of them have some type of battlefield functionality that makes them superior to simple rocks and trees.
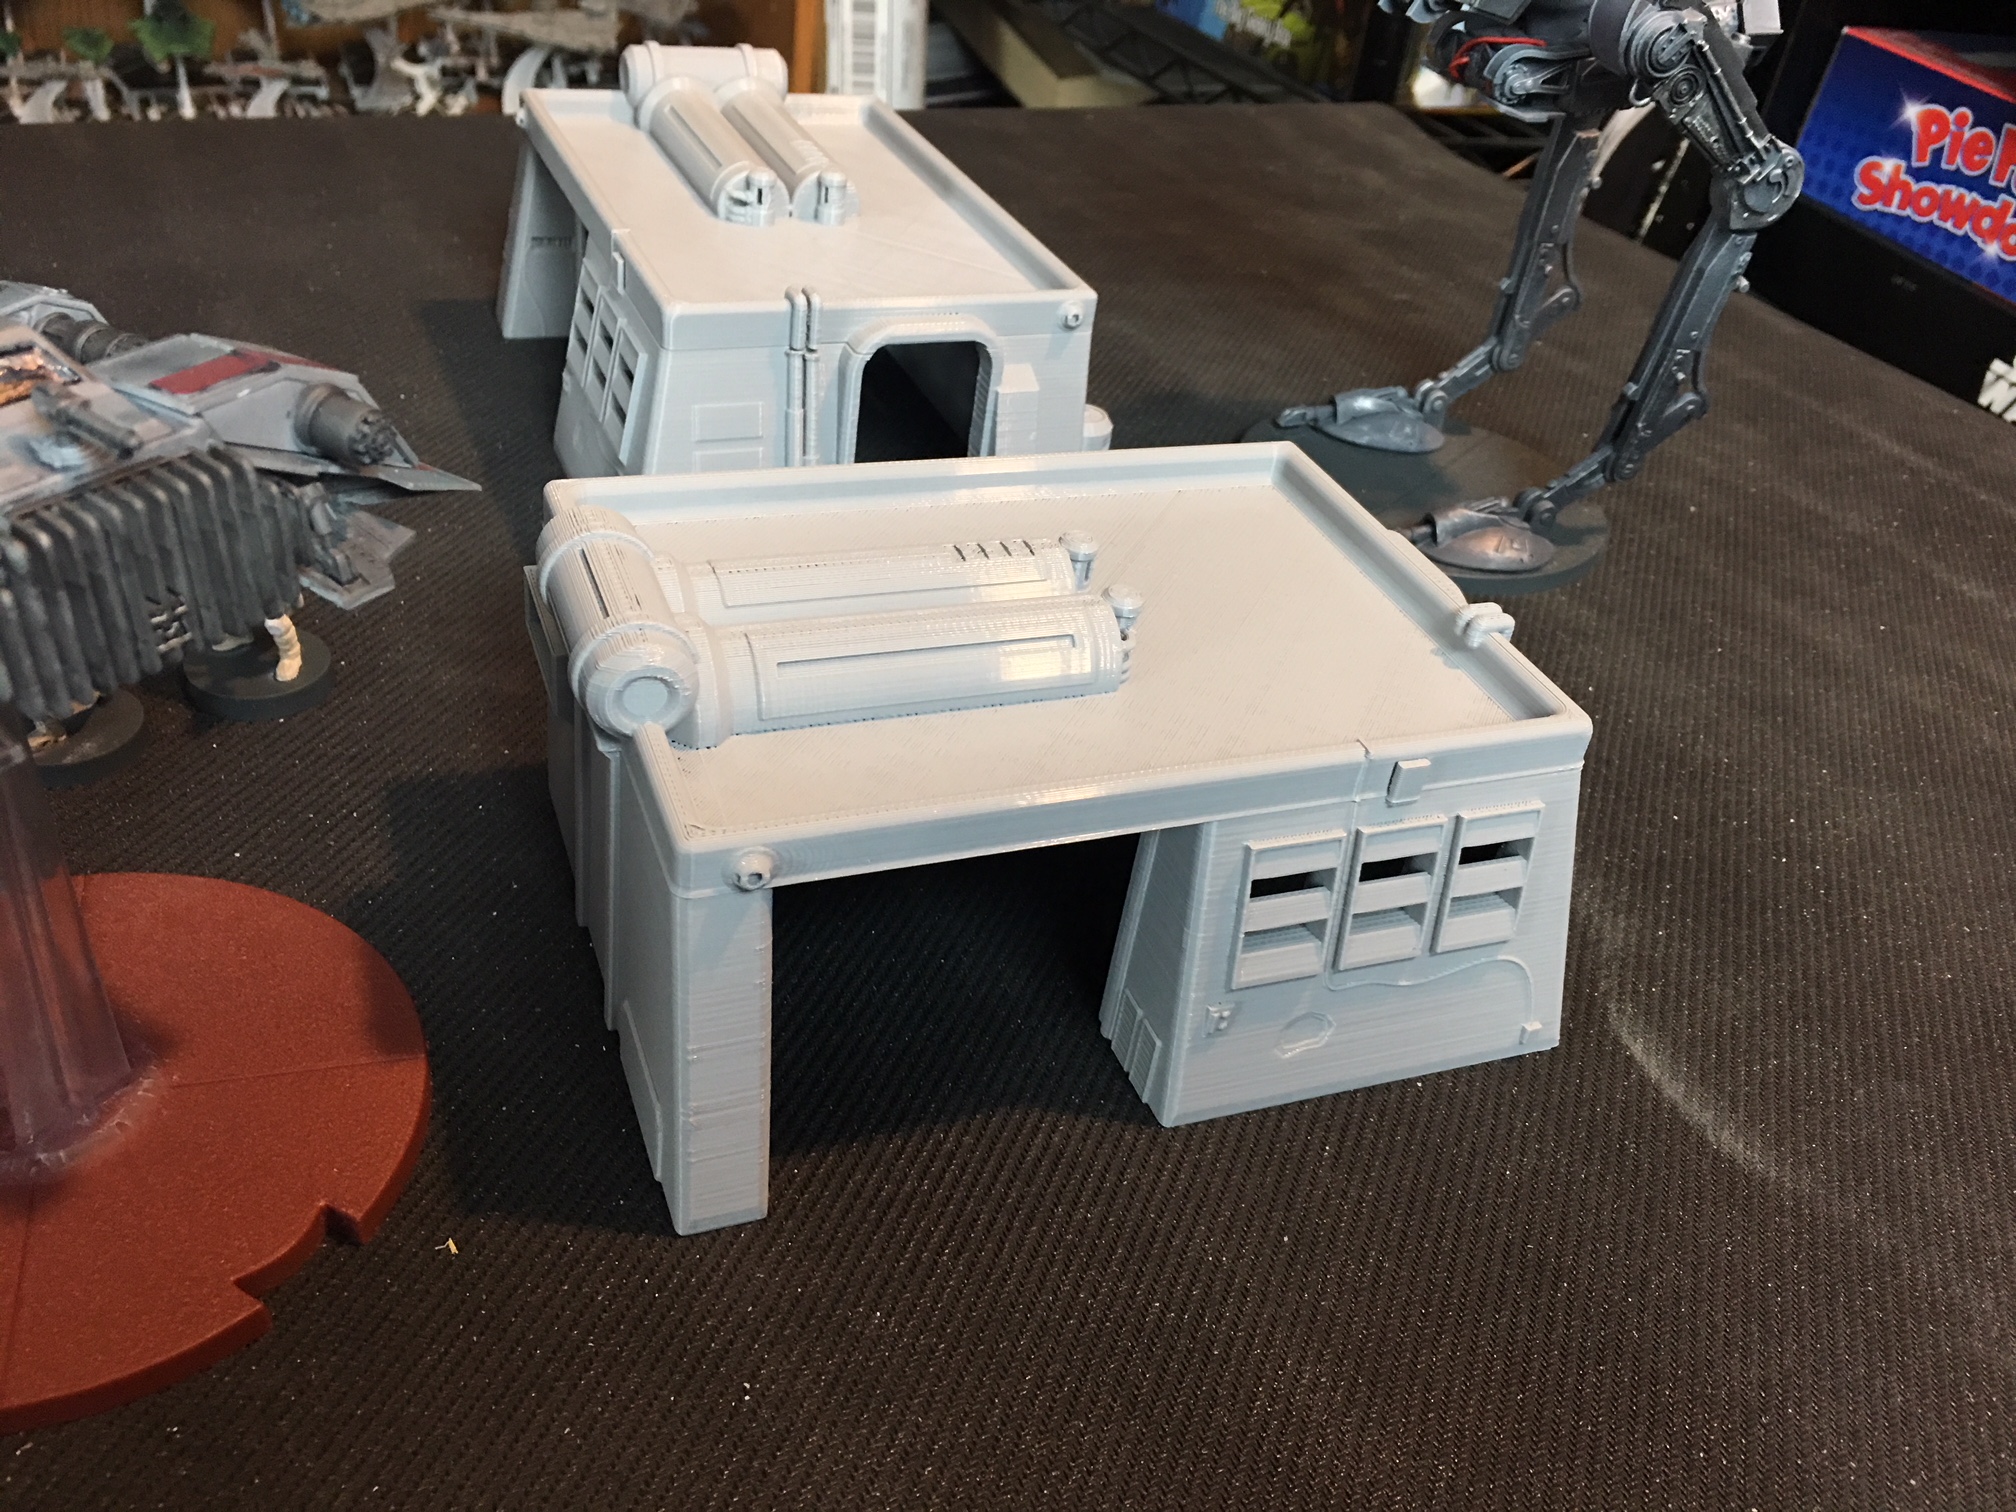
The Small Mechanics Shop
These little shops make perfect buildings for any setting. They feature a mostly flat roof, which accomodates fitting troops on top, and even the occasional speeder bike. The feature a built-in ladder on one side to facilitate easier climbing up and down. They are tall enough to easily fit troopers inside as well. The two doorways offer multiple paths in or out, and the removable roof allows you to separately move and measure units above and below.
Having buildings with an interior that is accessible during the game, really enhances the possibilities. Perhaps you place an obstacle inside, rather than on the roof? Perhaps you hide units leaders inside after grabbing an objective! These little shops are very versatile and beautifully detailed.
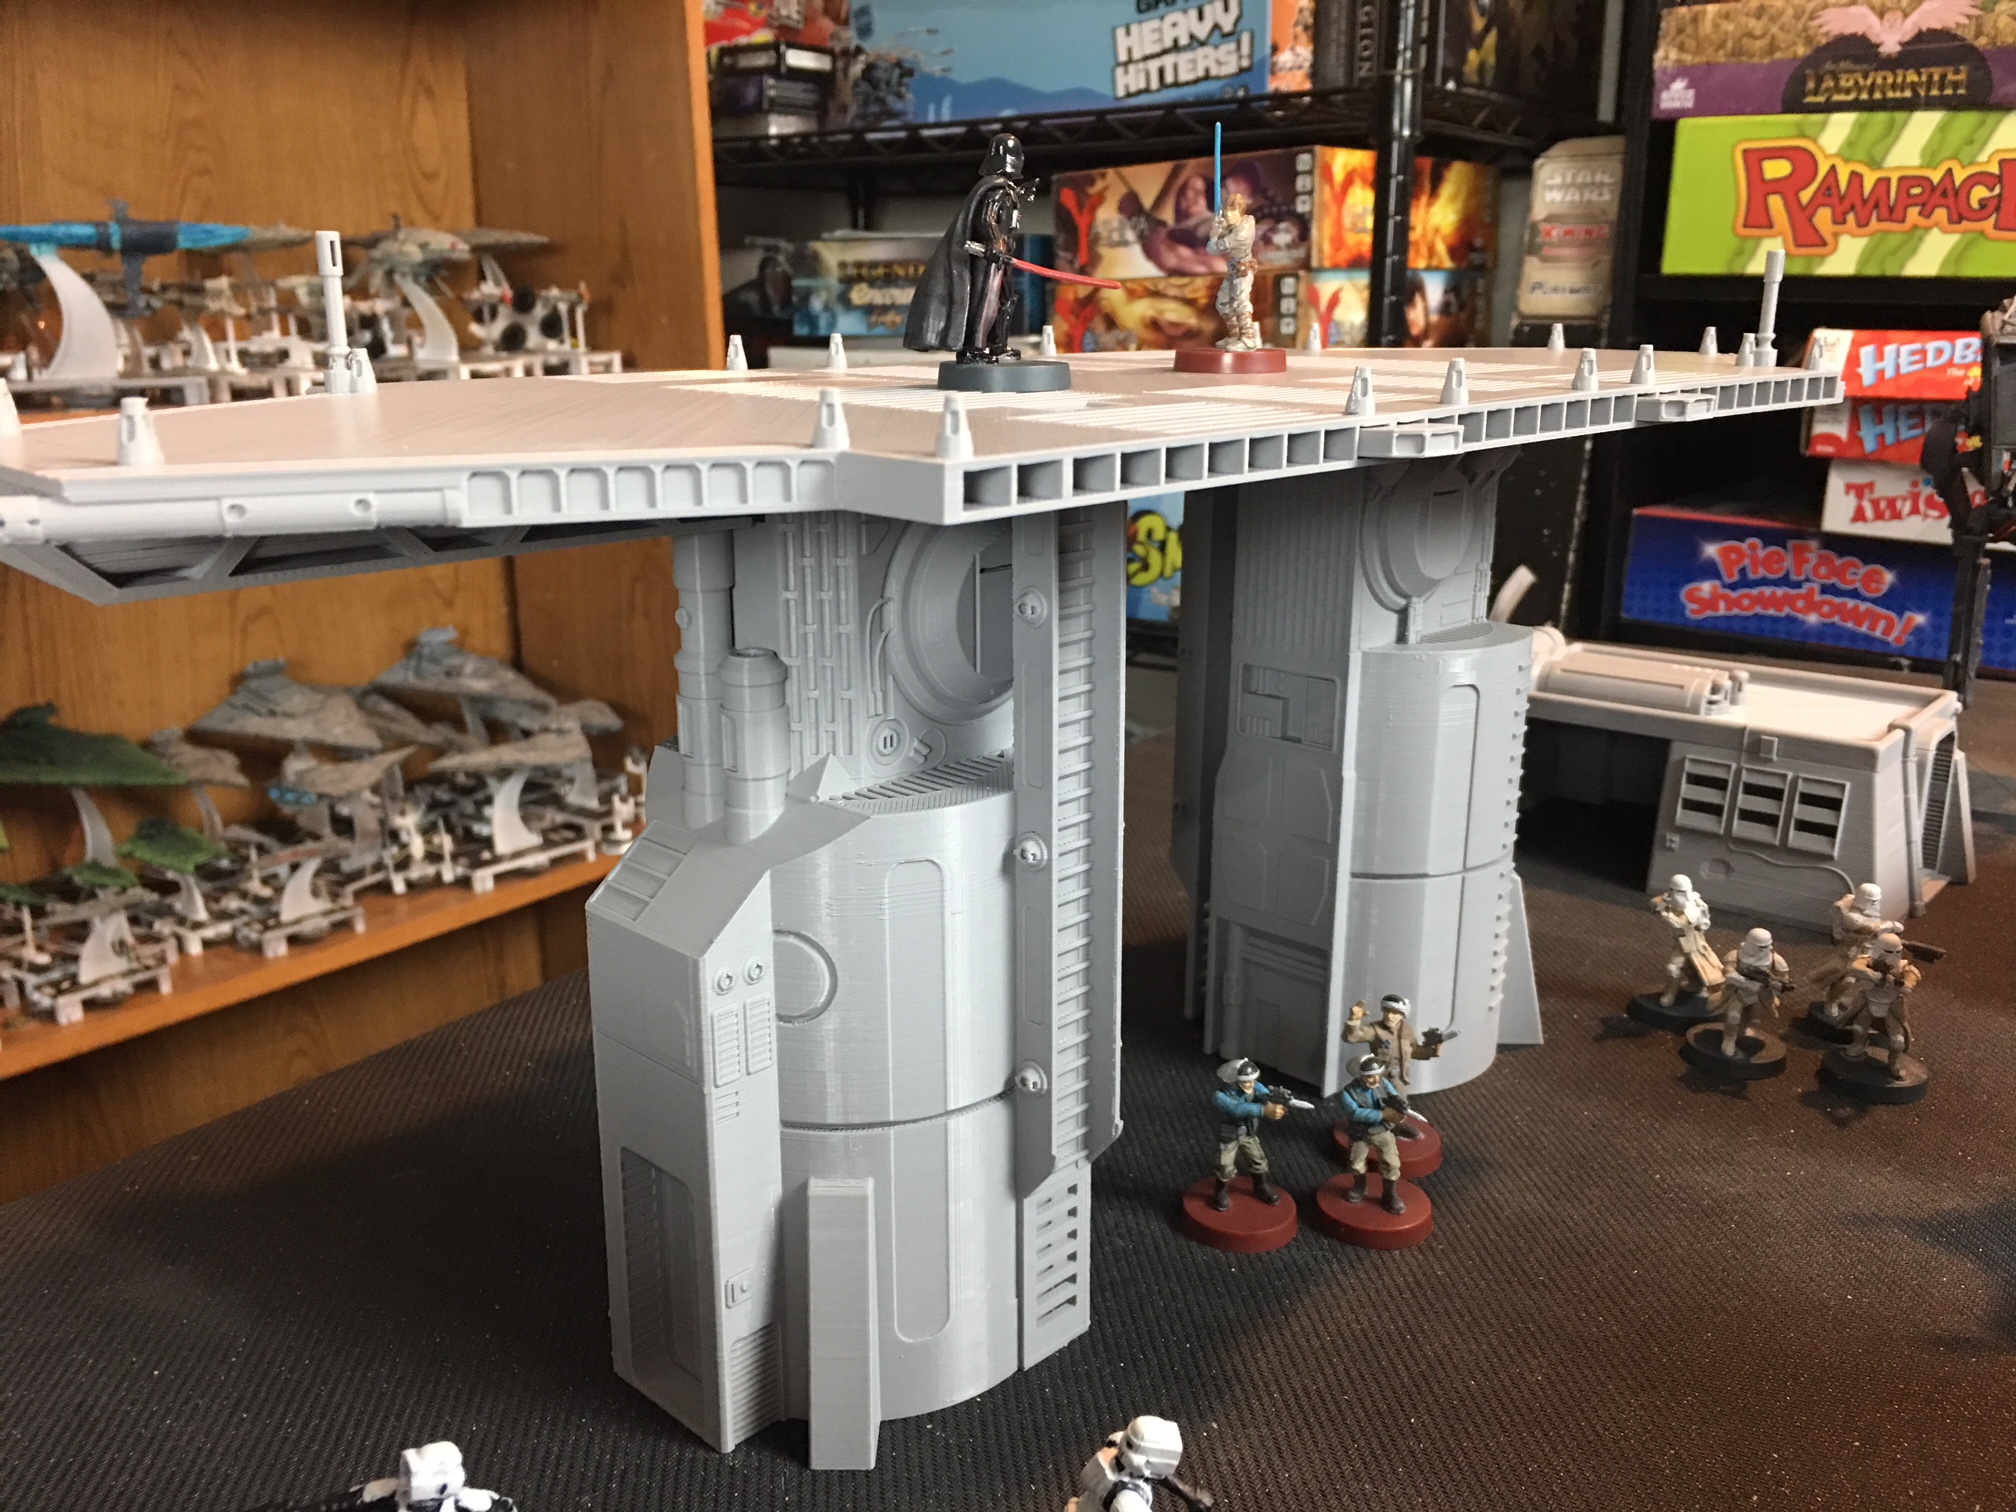
Landing Pad
The Landing Pad is simply amazing. It’s hard to say more than that, simply because the size and detail here are unparalleled. In the above picture, there are actually two landing pads, joined by a leaf, which extends the top platform, however it is possible to connect 4 or more for even larger platforms. Each individual landing pad has an elevator door, a ladder, and enough space to land a standard starfighter on the top. They areabout 7 1/2 inches tall, which means they are considered height 2 as well.
Having terrain that is height 2 offers some very interesting game mechanics, in addition to simply being big and beautiful. Luke Skywalker, for example, cannot simply jump up there from the ground. Though if he were on a tall enough roof of a nearby structure, then possibly he could. The ladder however, does allow easier access to the top. The elevator, if you allow it to be used in your game, can offer alternate paths to the top as well.
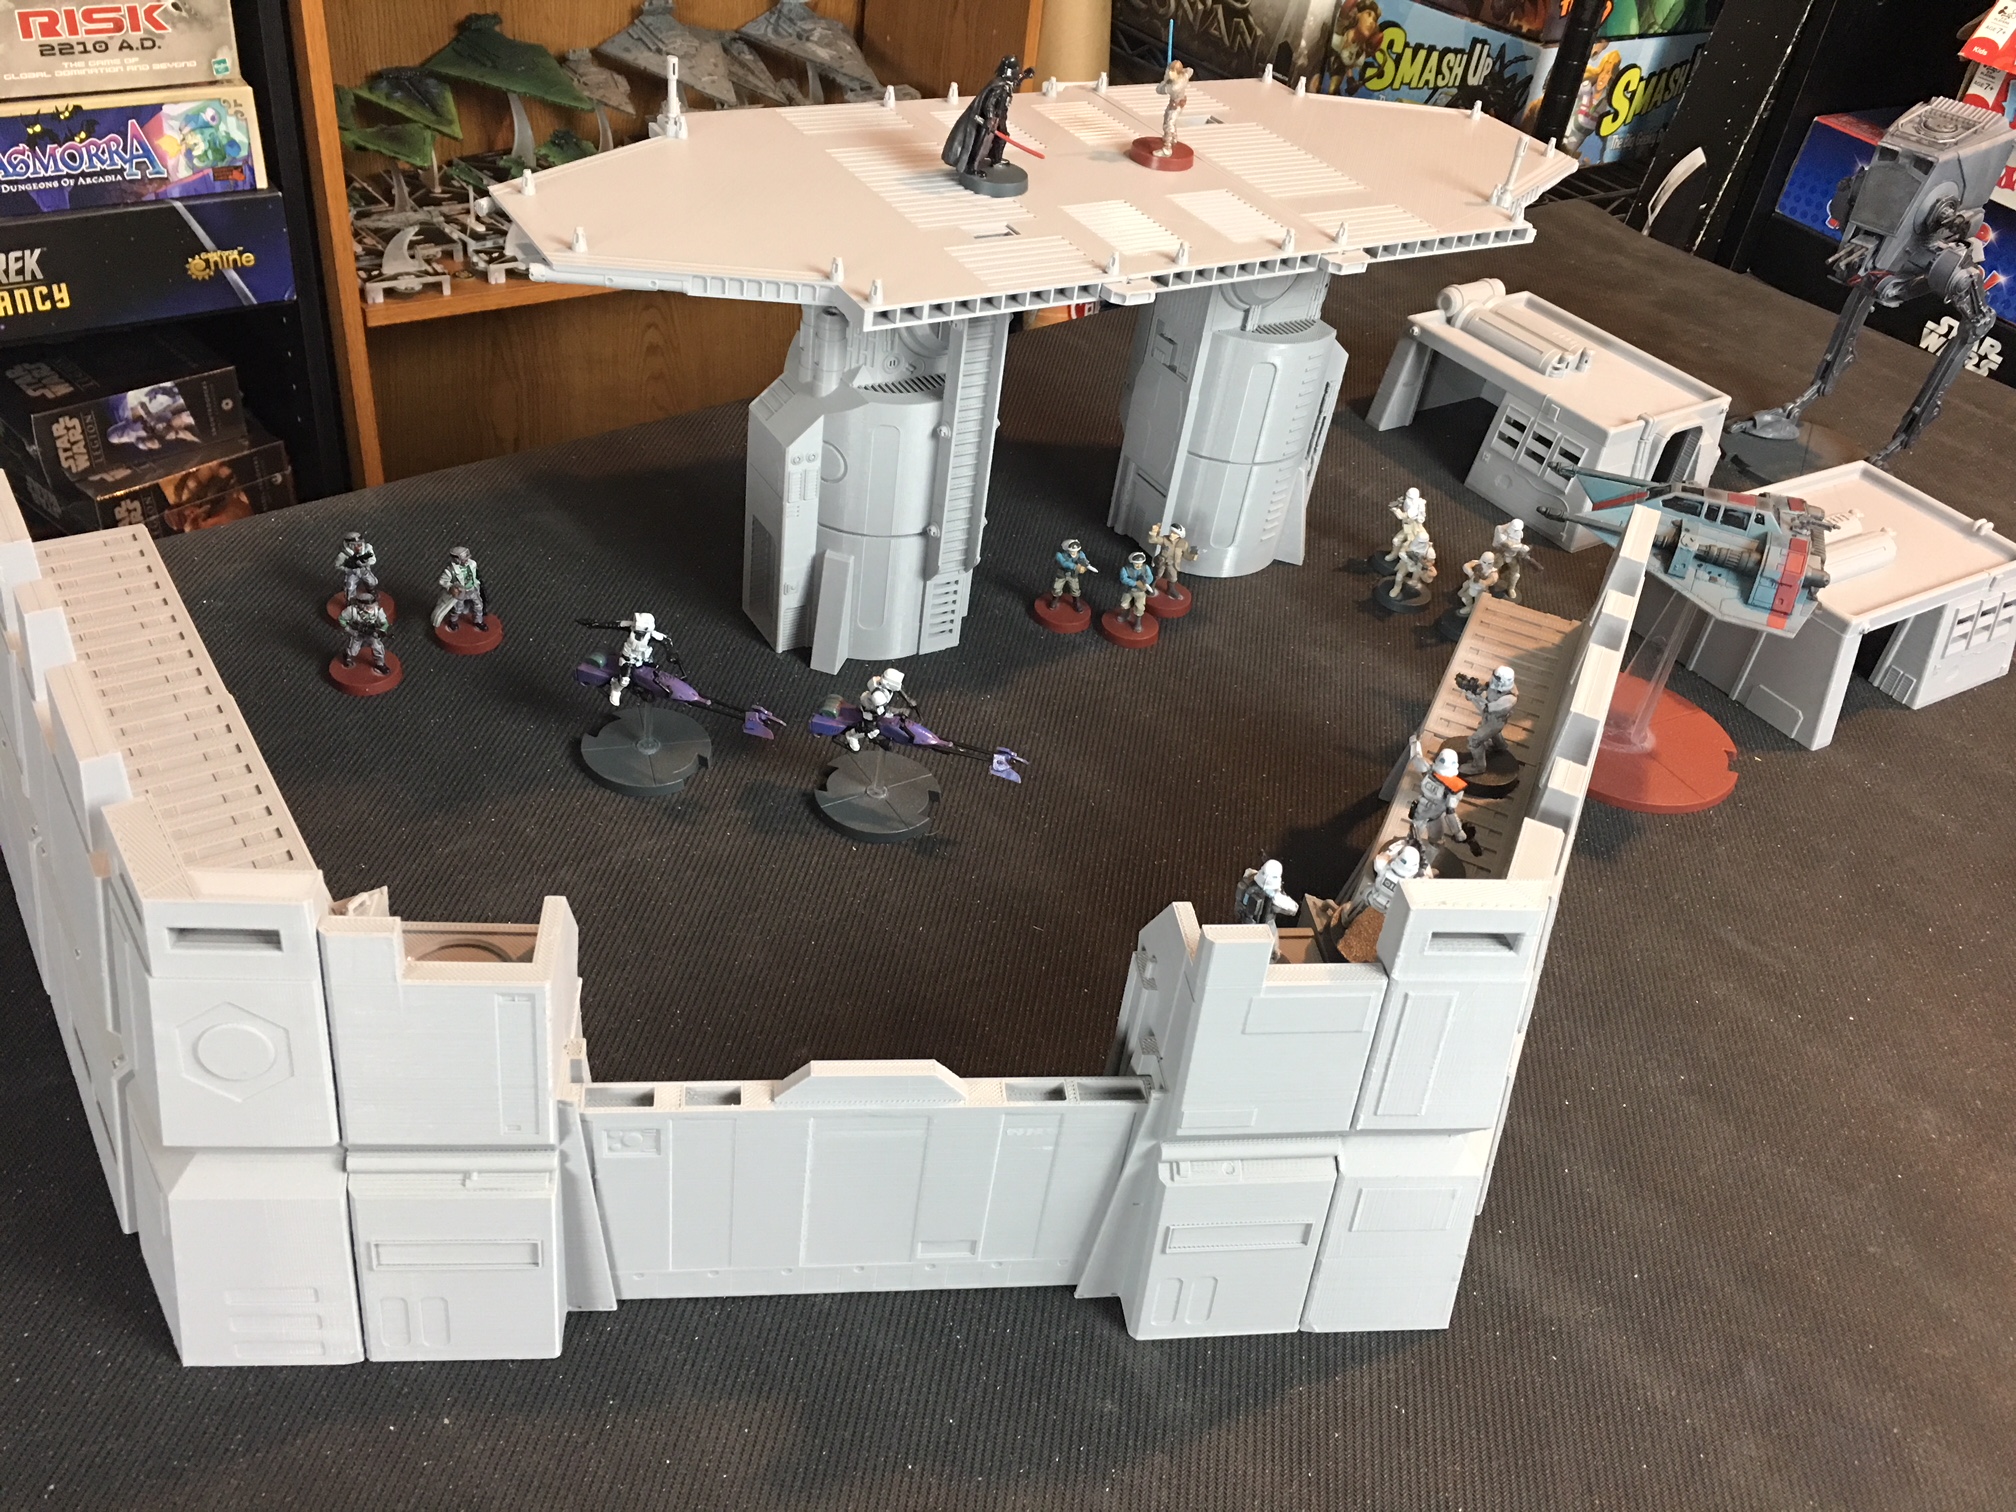
Imperial Forward Oupost
The Imperial Forward Outpost has several modular pieces that allow you to build it however you wish. There is also a gate that can rise and fall as well. Perhaps there is a control panel, or perhaps you agree that it will be closed until the beginning of turn 3, or perhaps you decide that the get is a destructible piece. There are so many possibilities with this outpost, that you may want to get multiples.
The interior is also full of intricate details, such as supply crates on the ground, and highly detailed floor grating. It allows troops on the top or the bottom, and can be set up as a small garrison, a wall across the battlefield, or with enough sets, a fully fledged castle!
Summary
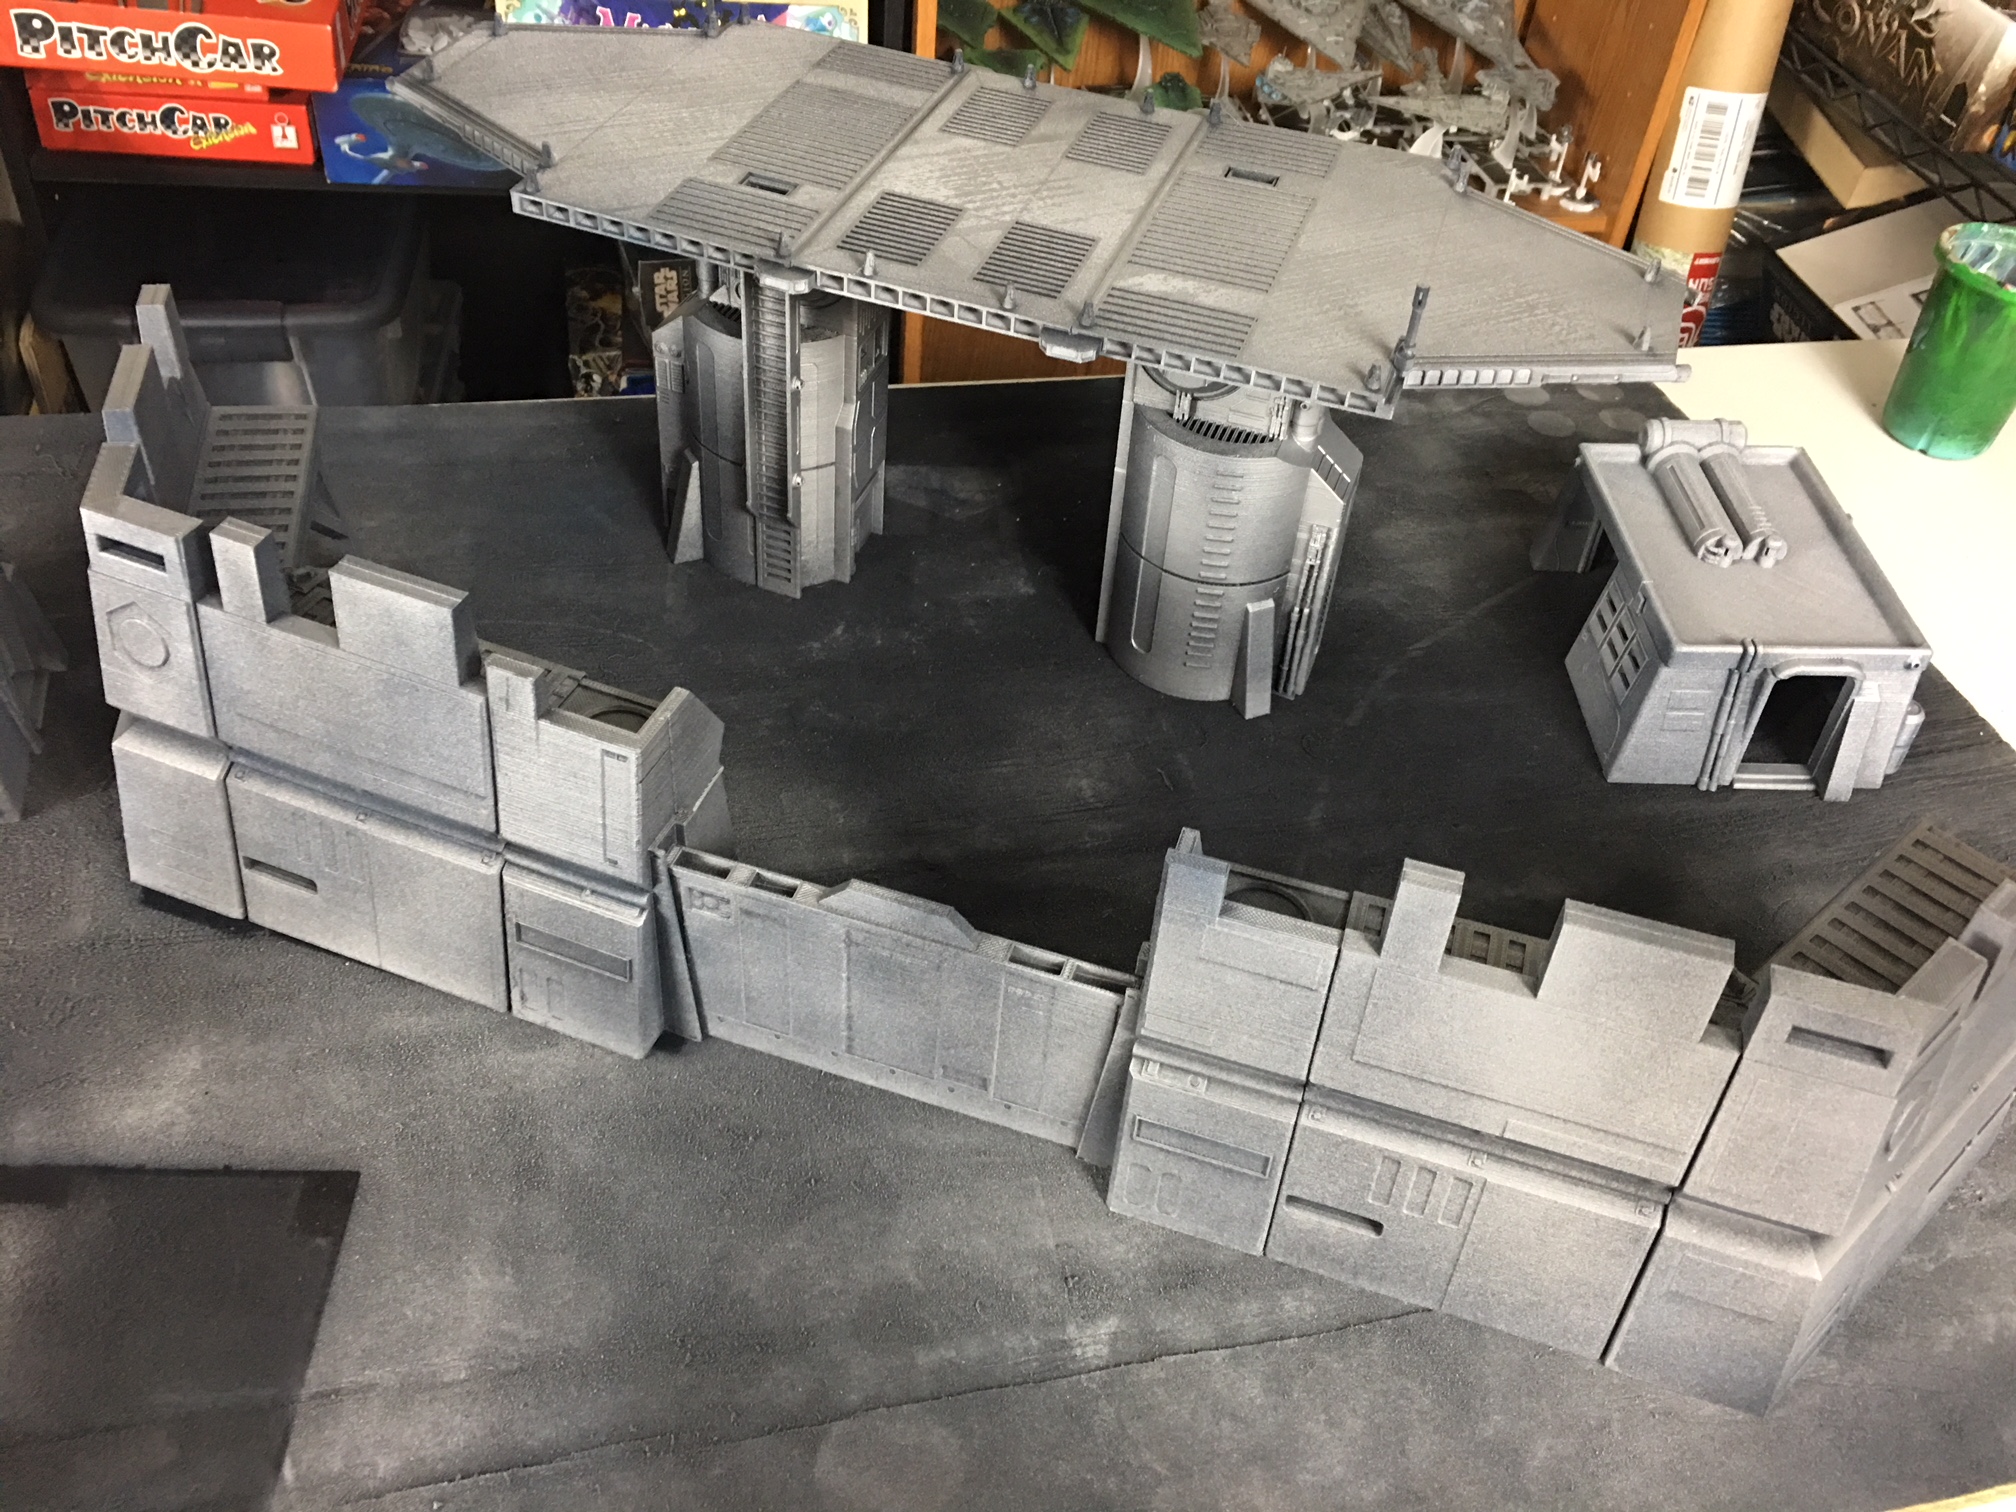
I absolutely love these pieces and will be using them in many future battles. Look for them in battle reports! I can’t wait to see how they influence the game! If you’d like to get your own, head on over to Imperial Terrain and either get an STL file to print yourself, or if you prefer they can print them for you and ship it! I might be ordering some more in the future!
Here is a video review if you’d like to see more!
Here are some pictures of the pieces after a quick paint job.
Imperial Assault just got a new announcement! It seems Thrawn, and the remaining heroes from Star Wars Rebels are making their way to Imperial Assault with this next expansion! This is great news for fans of Imperial Assault, especially those who feared the game was “”dead”, but this is also potentially good news for Legion players looking to spice up their game a bit.
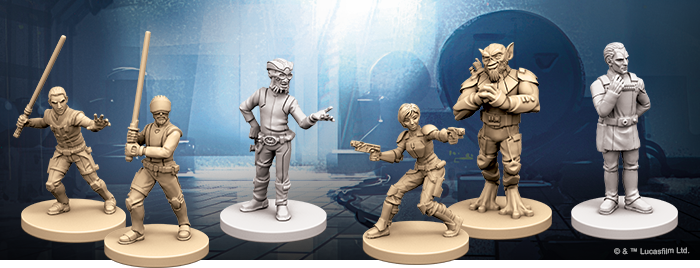
As with most other Imperial Assault expansions, this one comes with it’s own wave of blister boxes in addition to the Tyrants of Lothal small box. This wave is going to be loaded up with more principle character than almost any wave we’ve seen so far! We’ve already seen a glimpse into the possibility of them making a Rebels wave, since they released The Inquisitor, Ahsoka, Hera, and Chopper last year, but now we are going to fully complete the crew of the Ghost (or very close to it).
With the inclusion of virtually every main character from the show, it begs the question of whether of not FFG is simply trying to tie up loose ends, and wrap up this game permanently. The release of Legion, in a very similar scale has seemed to be a total replacement for Imperial Assault, allowing battles in a larger scale, with better miniatures, on better terrain. And the best part is that you don’t have to assemble a new map out of dozens of puzzle pieces every time!
Not everyone was included however. Some characters simply didn’t make the cut. Noteworthy absences include Ruhk, Governor Pryce, Kallus, Ryder Azadi, and the short time crew member, AP-5. If they do eventually keep Imperial Assault going, there are certainly more characters available that would fit naturally. Don’t forget about the increasing popularity of Dr. Aphra, and the fact that IA already has her two droid friends from the comics. There are still a few minor loose ends.
What does this mean for Legion?
Deathtroopers! For starters, if you’ve wanted Death Troopers in your game, but didn’t want to paint your stormtroopers black, well now you’ve got a proxy model that’s going to look the part and be ALMOST the same size. It’s long been speculated that Death Troopers will be coming to Legion at some point, and this might be the perfect mini to hold you over and practice your painting skills on, (because an all black trooper can be tricky sometimes!)
There’s also everyone else! If you’ve longed to use the entire Ghost crew on your tabletop, you now have your chance. Weather you want to paint them and proxy them all as a Rebel Trooper unit, or swap them out for unit leaders, you will soon have that option. You can use them as-is, or perhaps you’ll want to re-base them, but cutting them off at the feet and gluing them to Legion bases. Personally, I’d sign Zeb up to be my Z-6 Trooper, because I think he’d love that huge gun! The same goes for Thrawn – Using him in place of a Stormtrooper leader, or even swapping him out when using General Veers, it gives you some additional customization options for anyone who has been eager for Thrawn, Deathtroopers, and the crew of the Ghost!
Keep in mind however, making modifications like swapping minis in from other games, wouldn’t be legal in any Organized Play scenarios – so if you want to play in a tournament you’ll need to use the correct miniatures. But for other times, this could be a great way to spice up your game! Just be sure and make sure your opponent is OK with you proxying models.
The original cards from the core set for Legion. Which ones should you eliminate? What do they do? What choice is best for me? I’m going to talk about all of that.
Deployment Cards
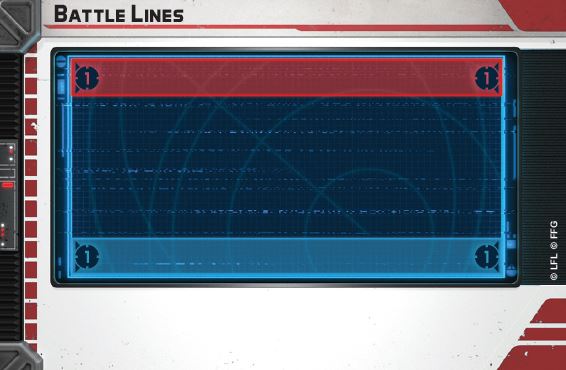
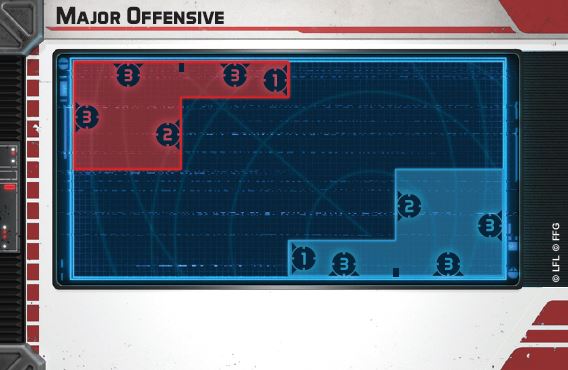
Deployment cards are going to tell you where your deployment zone is. The blue zone for the blue player, and the red zone for the red player. The numbers on the edges of the card, indicates how many range tools each section is, in terms of length and width. A (3) indicates it is range 3, or 18 inches (since each range unit is exactly 6 inches). Many of these deployment cards are going to force you to take a look at the terrain on your board, and determine which one will work best for your army.
Each card is going to by symmetric between the blue player and red player. For this phase, there really isn’t any difference between the two colors, so if you end up being the red player, don’t worry.
Battle Lines is easily the most basic of all deployment cards. It allows you to deploy anywhere on your side, within range 1 of your edge. This is fairly universal and gives most armies a lot of flexibility. It’s worth noting that starting with this deployment can have the highest potential of having shots fired on the first round, so be careful how far forward you start marching those first few troops.
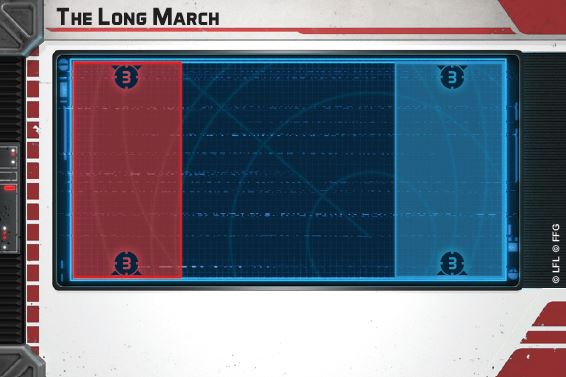
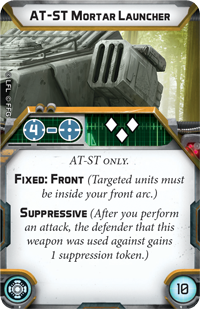
The Long March, is also fairly basic, but will have you playing at the short ends of the table, marching towards your opponents from potentially a longer distance. This one can be favorable to fast units, especially those with compulsory moves. This one can also benefit extreme long range attacks, like the mortars from the AT-ST, which have a minimum range of 4.
Major Offensive is giving each of you opposite corners, but it also extends moderately far into the center. This one is interesting in how it extends into different depths of the board, and can really depend on how your terrain is laid out, on weather or not this one works best for you. Generally, I tend to prefer this deployment only if I have blocking terrain near the center, but slightly closer to my side, allowing me flexibility of deployment, as well as covered approach paths, to objectives.
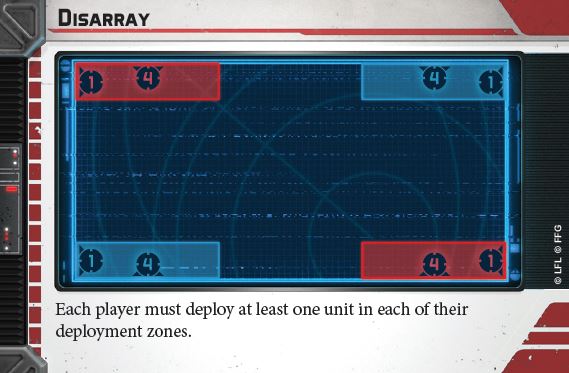
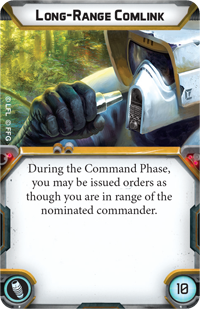
Disarray is the most difficult to set up for new players, and easily the most chaotic. Newer players are likely only have a single commander, and since it requires you to deploy units in BOTH corners, you are going to be forced to split up your forces in different areas, leaving some units beyond standard command range. This can work well however, with builds using cards to mitigate this distance, such as Long Range Comlink. Another way to utilize this deployment is to simply ignore the disadvantage, by focusing on corps units, and simply putting all of them on one side, and your commander plus whatever remains on the other corner. You’ll be able to issue orders to Heavy, or Support units for example from your commander, and then pull from the pile to get your corps units with ease. If you have 6 corps, and heavy, for example, this might work for you.
Condition Cards
Condition cards are telling you something about the condition of the battlefield you are fighting. Maybe it’s a bright sunny day, maybe it’s foggy, or snowy. Whatever the condition, it’s going to have an impact on your tactics. You’ll want to avoid certain conditions that might cripple your army’s strengths.
Clear conditions is simple. It has no effect. This is equally good for everyone, and that means sometimes you’ll purposely want to eliminate this one if the one behind it might hurt your opponent worse than you.
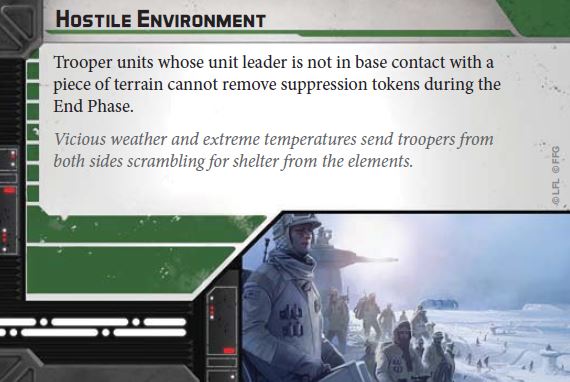
Hostile Environment makes it more difficult for troopers to remove suppression. It also means that trooper units are less likely to end up in the open, while trying to move from one objective to another. If you are particularly trooper heavy, and your battlefield has lots of wide open spaces, you may want to avoid this one. If you are using a lot of vehicles, your penalties here could be minimized.
Rapid Reinforcements is unique in that it doesn’t reference the battlefield itself, but rather the availability of the troopers within it. This one could potentially hurt a build that is maxing out on heavily upgraded troopers, as it will be far more difficult for a player to set aside 2/3rds of his stronger configured trooper units for a few turns of the game. If you feel like you have plenty of troopers, and can afford to play without them for the first few turns, then perhaps you may enjoy this one. As a side note – any future trooper units can also be effected by this card, so as more troopers enter the game, the tactics for this card may evolve.
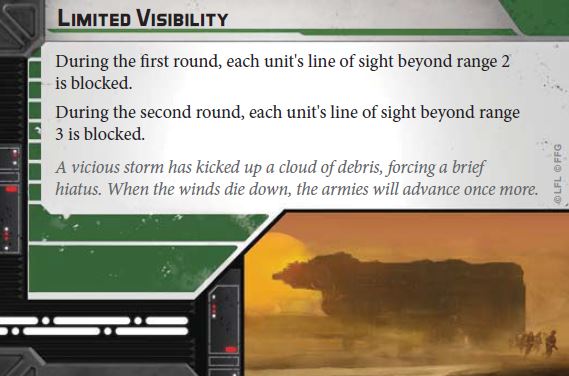
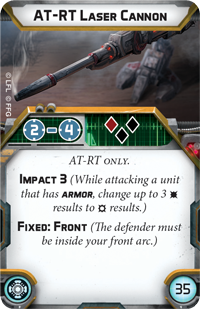
Limited Visibility is the best condition to have, if your opponent is equipped with long range attacks that they’d like to use on the first turn. If they are using Leia or Veers, then they’ll have command cards capable of striking you at distance 4 or beyond from the first turn. If they have long range weapons, like the AT-RT Laser Canon, or AT-ST Mortar Launcher, then they’ll also be at a disadvantage, unable to fire at you until after the fog has died down.
Objectives
Objectives are how you win the game. Well, technically you can also completely destroy all of your opponent’s units – but more often than not it’s going to come down to objectives. The right objective can make or break the game for you, so make sure you pay close attention to these.
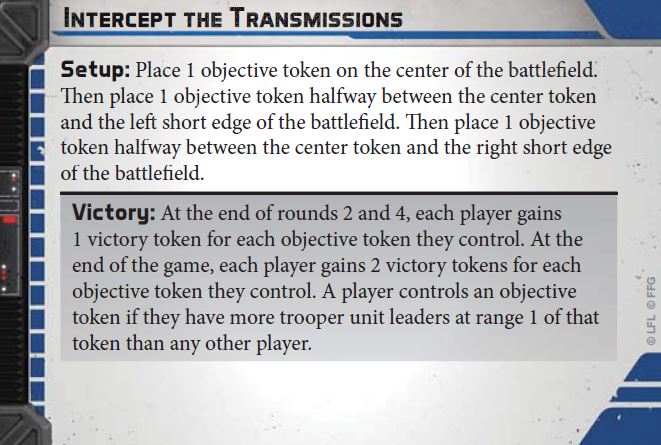
Intercept the Transmissions turns the game into area control. It’ll will most likely be a fight for the center, as typically one player will end up having an advantage on the left, and the other player will gravitate more to the right. If you have a build that can lock down 2 areas of the battlefield that you’ve built, then this might benefit you. Troopers are crucial for this objective however, in that only trooper unit leaders can give you control of one of the three objectives. A vehicle-heavy list is likely to struggle with this objective in that while vehicles may have some firepower, they have no ability to gain victory points.
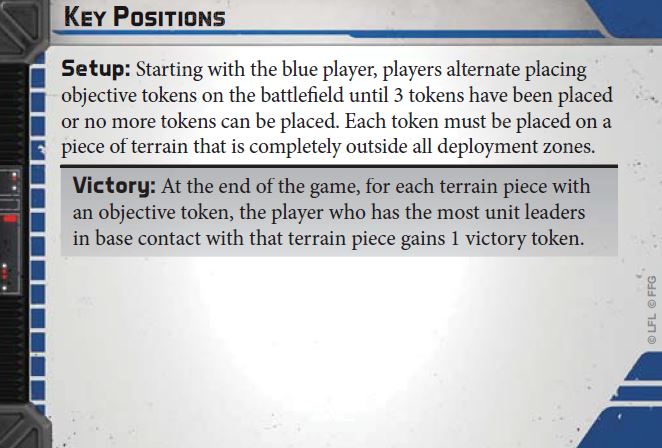
Key positions heavily favors the blue player. There are only 3 tokens to be placed and the blue player gets to pick two of them, which means they can select the two terrain pieces that are easiest to defend. Any type of unit leader can compete for control of the terrain pieces however, so vehicles are fine for this one. I like to think that AT-RTs with long range weapons like the AT-RT Laser Canon can be great here, since they can climb on top of an obstacle and hold it, while firing at a distance to cover another one. If you are the red player I’d seriously consider eliminating this objective.
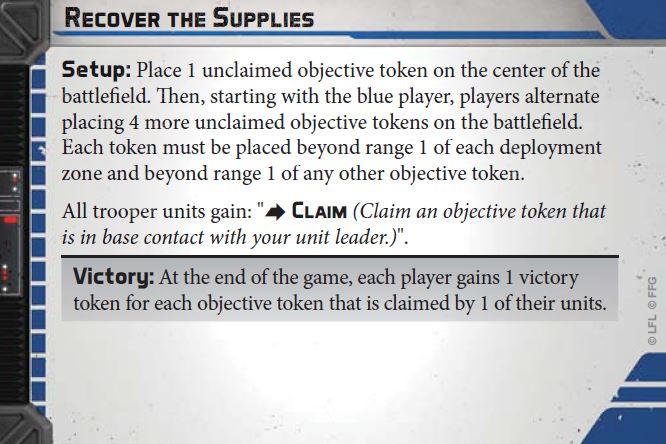
Recover the Supplies is another objective that heavily favors trooper-heavy lists. You are going to have to claim an objective, and keep it safe until the end of the game. If your build can put out a lot of suppression then you may be able to force enemies to panic, and drop their supplies, so that is worth considering. Also if terrain allows for strong hiding spots that block line of sight, you may want to consider claiming supplies and staying safe. Vehicle heavy lists may struggle with this one if they cannot get at least 3 tokens claimed and kept safe.
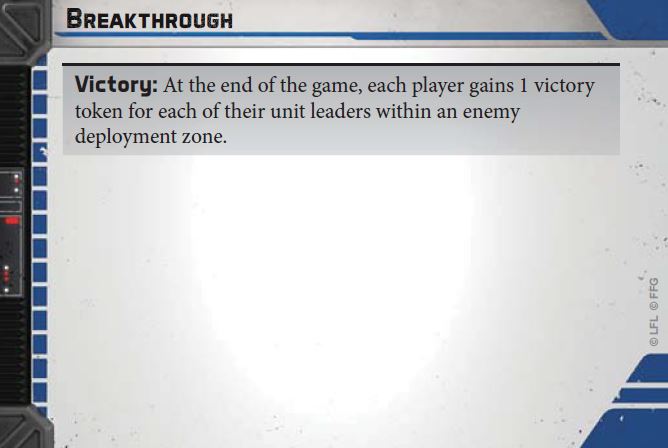
Breakthrough is a pretty fun objective and perhaps has the most interesting dynamic of all objectives that come with the Core Set. It makes your game almost feel like a sporting event that I might compare to a Star Wars version of Football. It favors the most units, and also favors fast units. Slow units will have difficulty making it to the enemy’s deployment zone, so if you have slower forces like Darth Vader, this one might not be the best for you. Personally, I’ve had success with this mission when using units that have high speed and compulsory moves. Even though rebel snowspeeders cost alot of points, they have the speed and survivability to spend a few turns shooting, and can make a break for the enemy zone right before the end of the game to make the difference. Generally however, if your opponent has several more units than you do, I’d steer clear of this objective.
In Summary
If you prefer a video instead of reading all of this, here is a video as well!
Hopefully you found this information helpful! Out of all the three card types, objectives are easily the most important, but they are also influenced heavily by the other two. The one constant that I’ve found, is that most winning builds tend to favor quantity, over quality – so the more units you have, and thus, the more unit leaders you have, the better your chances of gaining victory tokens and winning the game!


