The Video – In case you prefer.
A long time ago when Armada was still new, I had started doing a series of videos on objectives, but never finished them. I’ve decided it’s time to revisit Objectives and I’m going to start out with the Original Reds! These first four are the originals. The Classics. They came with the core set and everyone should have them. I’ll also be covering the objectives that come in the Corellian Conflict at a later date.
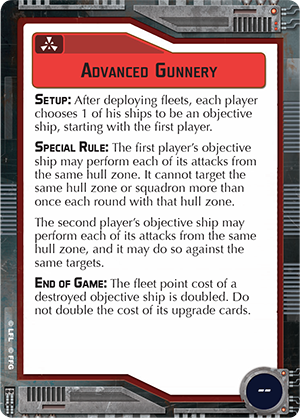
Advanced Gunnery is a dangerous objective to take, as it can benefit both you AND your opponent. It also tends to be risky because it gives a benefit to your opponent as well, and if you are unlucky they may kill your objective ship and get a huge extra chunk of points. Also, with most heavy-hitting ships, you want to add gunnery teams, and this objective specifically won’t work with Gunnery Teams, because Gunnery Teams deny you the ability to attack more than once out of the same arc.
When should you include it:
One of the most common reasons to include this card is if you have a heavy firepower ship that does not, or can not, take Gunnery Teams. This might be the case if you are running an Ackbar Build with an (H)MC-80. MC-80s tend to be good targets for this, because they are tough enough to hopefully survive. You can also consider running this on an Imperial Star Destroyer if your weapons team is occupied by something else, perhaps a boarding party. Though most of the time if I’m running an ISD, I will often use Gunnery Teams instead of taking this objective.
If you are 1st Player :
Usually you don’t select this one. However, if you’ve got a tanky ship that simply couldn’t take gunnery teams…. and you feel confident in being able to use this benefit better than your opponent, feel free. It is important to note, that while the 1st player’s objective ship doesn’t get quite as good of a benefit as the 2nd player’s objective ship, you CAN still potentially attack the same ship twice if you are first player – You’ll just need to get that big firing arc into a position where it can attack two different hull zones of the same ship.

Opening Salvo is a favorite of mine. It is one of those that gives something to both players, but really benefits fleets with a lot of ships. It also offers the 2nd player the rare opportunity to throw black dice at long range – which can lead to some interesting combos. One key point here is that you MUST discard your objective token the first time you attack a ship, so you actually may find yourself skipping your attack if it’s against a ship you don’t feel comfortable wasting your bonus, while shooting – (Perhaps a Gozanti with Tua and Electronic CounterMeasures). This one also gives half score to players who manage to damage but not destroy enemy ships at the end of the game. Great for those Star Destroyers who manage to avoid death, yet still take some damage.
When you should include it:
You absolutely want to include this in high ship-count lists. If you are running 5 or more ships that can shoot (Sorry GR-75 Medium Transports), then this is usually a good bet. It’s also nice to include this one if you’ve got specialized crit cards in your build, like Assault Proton Torpedoes, as you’ll now have an easy way to trigger those at long range. It also helps to have some dice mitigation since you’ll be adding lots of dice here, so cards like Home One, Darth Vader, Ordnance Experts, and Leading Shots may be helpful as well.
If you are 1st Player:
If you have less than 4 ships you’ll most likely want to skip this one. If you DO take this one you’ll generally want to have a lot of shooting ships. If you have more shooters than your opponent, then I’d say absolutely go for this one. Keep in mind you’ll only get red dice added to your first attacks, but that can be fine, especially if you’ve got Turbolaser Reroute Circuits equipped, or if your commander allows you to make the most out of those extra dice, like Darth Vader loves to do. Also, since your are first player, at the start of each round you may want to prioritize attacking an opponent’s ships that still have an objective token, denying them both an activation and a powerful shot.
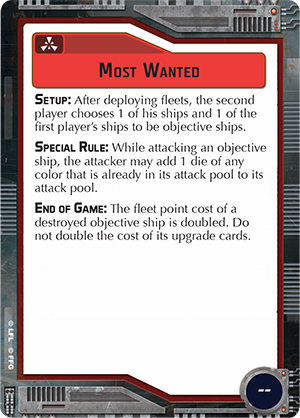
Most Wanted has literally made the difference in games that I would have lost otherwise. The key with this card is that it lets the second player make both choices. It does two things – It allows the 2nd player to pick one of the 1st players biggest ships that will end up being worth double points, (while picking one of their own least-important ships), and also gives extra dice to attacking ships that go after said objective ships. Also this card has been errata’d in the official FAQ – under the SPECIAL RULE, it only allows SHIPS to add 1 die of any color, not any attacker.
When you should include it:
To make this card really shine you’ll need 2 things. First, you’ll need some decent ship to ship firepower. Several shooters would be good, since each ship that attacks the enemy objective ship will gain the bonus die. Also, you’ll need a cheap ship, preferably a flotilla, to make your own objective ship. This will minimize the impact if you lose it, and if you opponent gets bonus dice when going after a ship that isn’t exactly crucial to your build, then so be it.
When you are 1st Player:
This is one that a 1st player seldom wants to pick. The only times you will want to chose this one are when your opponent won’t really get much out of it – weather they forgot to include a flotilla, or all of your ships are cheap and relatively worthless, (Hammerhead/CR-90 Swarm perhaps?). Now if you happen to have a Hammerhead Swarm and your opponent has 3 Imperial Star Destrors plus a few TIEs, you actually might want to pick it! You have to estimate that your opponent will pick his or her least valuable ship and your most valuable ship, and that both may get destroyed and ship value doubled. If after doing the math, you still come out on top, then you might pick this one.
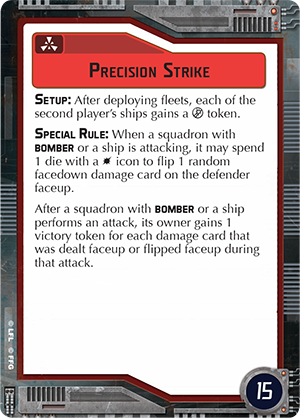
Obviously Precision Strike is meant to emphasize bomber-based fleets. But at a second glance, you don’t need bombers to make it work. (It just helps). It’s going to give the 2nd player a concentrate fire token to each ship, which means if you are running a token-based commander like Tarkin of Garm, you’ll see very little benefit from this first part…. but the key is in the victory points that can be racked up. This one has also become significantly more impactful since the core set wave, since we’ve seen new things that can really aide the bombers, such as Bomber Command Center, and Intel – really making it easier to rack up the points. However, this card also offers very little as a bonus for the second player – and if you take it you run the risk of facing another bomber-based fleet
When you should include it:
If you have a significant investment in bombers, you may want to consider taking this one. You’ll also need some anti-bomber mechanics as well, in case you face a ton of Y-Wings or TIE Bombers – because you absolutely don’t want the 1st player getting more points out of your own objective than YOU. Your ships can also score points here, so agile, maneuverable ships like CR-90s are capable and tend to fit into bomber lists with ease.
When you are 1st Player:
If you have bombers. Especially if you have more bombers than your opponent. Any time you can turn your opponent’s objective against them, it’s going to be one heck of a ride! Also if you have an effective way to deal with your opponent’s bombers, this might easily be the best objective to pick. If you have few or no squadrons at all, then I’d strongly suggest passing on this one.
That wraps up the original red objectives! Check back soon because we’ll be taking a look at the rest of the core set’s Objectives, and then diving into the Corellian Conflict’s new ones after that!