The Original Blue Objectives
This third installment of objectives are dealing with the original blue objectives that come in the Armada core set. I also have covered reds and yellows, and will soon be covering the objectives in the Corellian Conflict as well. Lets get started!
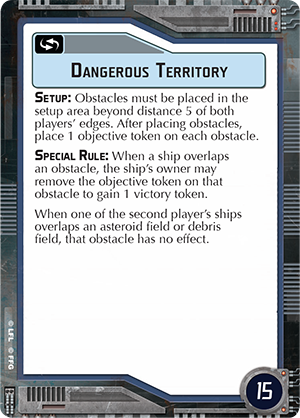
This one is a simple points race. You land a ship on an obstacle, and you can gain a victory token. It also has the clear benefit of allowing the 2nd players ships complete immunity when landing on asteroid fields and debris fields. There are some common questions with interactions here that have been answered in the FAQ as well. First – Grav Shift Reroute moves these obstacles, the tokens move with them. Second – Squadrons with Strategic are allowed to move tokens off these obstacles. In that case, the tokens must be placed back on an obstacle before it can be removed for scoring. And if a ship lands on an obstacles with multiple tokens, you only remove one token each time. See the Armada Errata page for a link to the latest FAQ.
Why you should include it:
One thing that’s nice is that you’ll get the ability to move through obstacles unhindered and your opponent won’t. Large Based ships can certainly take advantage of this. Also, if you are running Grav Shift Reroute you can pull some of these obstacles closer to yourself to make collecting them easier. This doesn’t give a ton of points though and isn’t terribly strong, but it also typically doesn’t help your opponent either.
If you are 1st Player:
If you’ve got Jaina’s Light in your fleet, is usually a sure thing to select this objective, because you’ve already got a ship that can land on those obstacles without taking any punishment! Also if you are running an Interdictor with a Grav Shift Reroute of your own, you may be able to reverse the placement of some of these rocks and pull them closer to yourself, giving you an advantage.

Another points grab, but this time it’s winner-take-all. Flotillas have made it easier than ever to send a ship after one of these objective tokens. Years ago, this objective used to be very bad for Imperial players who tended to run a Demolisher, and either VSDs and/or ISDs. An Imperial Player typically could NOT afford to send any of his or her ships out chasing after objectives, so this was an easy pick for rebels running a lone CR-90. Nowadays however, flotillas are so common that this becomes a more risky objective to take, as it can easily be turned against you.
Why you should include it:
If you’ve got several Strategic Squadrons and ways to give them extra movement, such as Squall, Fighter Coordination Team, or Adar Talon, you’ll have a much easier time of quickly grabbing three tokens. As 2nd player you’ll be able to place 3 out of the 5 tokens, so be sure and place them in such a way that you’ll be able to get to them before your opponent. You also want to ensure that you can keep your objective ship alive. For Empire, consider something like a Gozanti with Minister Tua and Electronic Counter Measures. For Rebels, a Bright Hope with Major Derlin would prove incredibly hard to kill. Fast ships like Raiders and CR-90s also can make for good objective ships.
If you are 1st Player:
If you’ve got more Strategic than your opponent, and think you can get to those objective tokens before your opponent can, then you can turn this against him or her. Alternatively, if you’ve got a force that can quickly kill their objective ship, then you can also stop them from collecting points. A swarm of CR-90As with Turbolaser Reroute Circuits for example, can quickly move into striking distance and concentrate on a lightly defending objective ship.
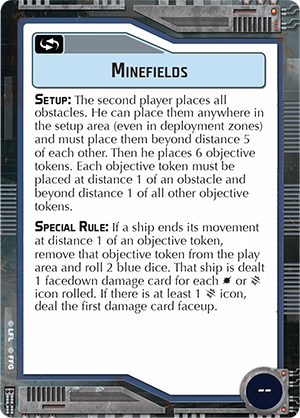
A classic objective of telling your opponent which way they should approach. This one used to get used a ton before Strategic came around. Now it’s quite risky to use this if you don’t also bring in some Strategic Squadrons of your own.
Why you should include it:
If you’ve got Dodonna, you can trigger his ability if your opponent trips one of these mines and rolls a crit, so that is a very fun part of this objective. It also helps you generally control which ways your opponent can come into the fight, so if your fleet is very vulnerable to flanking this one can help. You’ll probably want to include some Strategic into your build, just in case your opponent has some Strategic of their own. And if not, it helps to re-purpose those mined that your opponent managed to miss. It’s great to push them again and again! Also, keep note of your opponent’s build. If they don’t have any strategic, you might even consider putting many of these mines closer to the center of the board so you can push them all directly into your opponent regardless of where they deploy.
If you are 1st Player:
If you’ve got several Strategic Squadrons and your opponent does not…. then absolutely pick this one. Nothing is more satisfying than pushing the 2nd players mine field back on themselves!
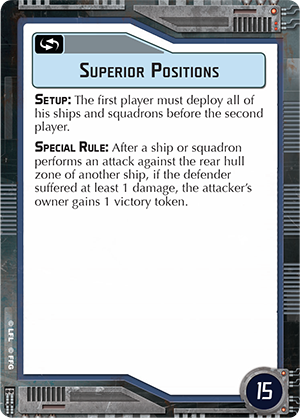
In my opinion, this one is by far the best of the original blue objectives. This one is especially helpful with modern fleets that might only run 2 or 3 activations. I also think this will be especially good in the future, with Wave 7’s new large ships. It punishes the 1st player by making them deploy EVERYTHING first. It takes away any deployment advantage they had. And it allows rear shots to reward both of you with victory points. Rear shots SHOULD be easy since you can see where your opponent is setting up.
Why you should include it:
This one is great for any list that has a big deployment disadvantage. 3 or less ships, for example. This list can also be very nice if you’ve got a good number of squadrons that aren’t likely to get engaged and locked down. Squadrons with Rogue are particularly nice here, but Intel will easily help your squadrons get rear shots. Maneuverable ships will also help you sneak around slower ships and get those rear shots as well.
If you are 1st Player:
If perhaps you were going to have a deployment disadvantage either way, then you really didn’t lose much by selecting this one. Perhaps you are running a 2-ship build heavy with Squadrons? Just set up in the middle and adjust accordingly – hoping your squadrons will get you a ton of victory points. Make sure you get those rear shots!
Hope you enjoyed my breakdown of the basic blue objectives! I’ll be covering the Corellian Conflict soon so check back often!