The Original Yellows
In my second round of covering the basic Armada objectives, I’m tackling the yellows that come in the Core Set!
The Video:
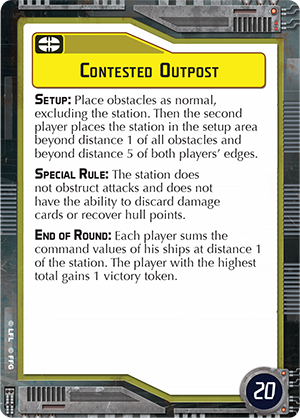
There are some objectives that scream “Come at me bro”, and this is one of them. Contested Outpost removes the station’s normal effects and instead turns it into a huge objective that the second player gets to place.
When you should include it:
If you’ve got a slow moving list that can easily hold a position. When you want the enemy to move towards you, and not the other way around. Slow moving Broadside lists, such as Ackbar MC-80s will be able to take advantage of this Objective. So will Lists that use a few Victory Star Destroyers. And While I am tempted to also suggest an Arquitens Conga Line, the lower command value of the Light Cruisers will make this one only a mediocre choice.
If you are 1st Player:
If you think you can take the station quickly, you might consider this objective. You’ll want to have some fast ships, and it’ll help if you can flank your opponent, because they’ll be set up to receive your charging offense. Fortunately your opponent won’t get too many points from this as long as you can eventually get there. Also, if you are confident you can table your opponent, you might simply ignore the station altogether.
 22
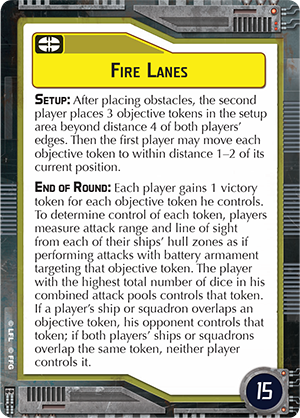
22One of my favorite yellows. I tend to place these very close together to create a heavily contested area, even after the 1st players adjusts them. It can net you 45 points per round, which, if you were actually able to hold all 3 for all 6 rounds, would be giving you the astounding sum of 270 points! With those kind of points on the line, do you even need to kill your opponent’s ships?
It’s important to note that upgrades that add to your battery armament will actually help you control these tokens.
When you should include it:
Similar to contested outpost, this one works great for any list where you want to dictate where your opponent goes. The difference here is that they won’t be able to simply ignore it. You’ll want ALOT of dice in your firing arcs. Arquitens swarms are a nice way to establish control over a group of tokens as well as contesting enemies that enter the “Killzone”. Large firing arcs also are great. Red dice will be your friend here, so you can get control early and keep it. VSDs, ISDs, MC80s, and AFMk2s are all solid options here. Also if you are including Strategic Squadrons in your build, you can pull these tokens even farther back, into safety.
If you are 1st Player:
Honestly I rarely take this one as first player. However, there are times when it’s possible. Possibly if the opponent doesn’t have much in the way of Red Dice, but primarily if you’ve got plenty of Strategic Squadrons and your opponent doesn’t. Strategic Squadrons will allow you to pull those tokens away from your opponent.

The Ambush Zone from this objective tends to create an awful lot of confusion. To simplify – It’s 2 full range rulers from the left and right side, and one full range ruler from each player’s edge. One important thing about this, is if you have little to no squadrons, this objective will prevent a squadron-heavy build from getting deployment advantage on you, since all squadrons deploy last. That is a double edged sword though, because those squadrons will also now have the ability to deploy MUCH closer to your ships.
When you should include it:
If you want to be able to start shooting on round 1. Having a fairly high number of ships also will help you be able to react better to the 1st player’s Ambush Zone placements. Also if you are lighter on squadrons, but don’t want to suffer a deployment disadvantage, this one might be good, for example if you are counting on a raider or two to deal with enemy squadrons.
If you are 1st Player:
If you have a major squadron advantage, and want to use your Ambush Zone deployments as an option to deploy your squadrons VERY close to the enemy, you might pick this one. Also, if you are including some Relay squadrons, even your rear ships will still be able to lend their support, and that could totally work to your advantage. Otherwise you might do fine with this objective if you have very maneuverable ships, that can deploy at odd angles in the ambush zone and quickly turn around and regroup with your fleet.
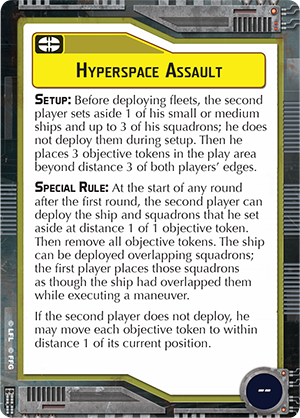
This one is actually a lot of fun. It represents a ship coming in from hyperspace with a few squadrons backing it up. It has tokens, which the 2nd player can move, which does make it susceptible to Strategic shenanigans, but it’s only a marginal risk for movement shenanigans because you can warp your ship in before the tokens get pushed too far away. Wave 7 is going to open up whole new levels of hysterical hi jinks with this objective as well, considering Raddus and the Profundity can do similar things.
When you should include it:
Strategic will help you get even more precision on where exactly you want to jump out of hyperspace, so if you’ve got some Lambdas or VCX-100s you may consider this one. Additionally, if you have an odd number of squadrons this one will “Fit” them better, since you’ll set 3 aside and it won’t impact your deployment as badly. In terms of ships, you’ll want to go with a ship that can really shine by being able to be placed in surprising locations. A Victory Star Destroyer, for example will really be a hindrance when you place it behind your opponent’s Liberty. Keep in mind that you’ll be activating second, so even if you end up behind a ship at close range, they’ll still be able to move out of the way first.
If you are 1st Player:
A few strategic squadrons might help, but I think if you want to really turn this one against your opponent you’ll need to have a build that is maximizing Strategic, by using other mechanics that allow Strategic squadrons additional activations or movements. Additionally this one will help your deployment advantage, so if your build needs help in that department it may be worth it to select this objective.
This concludes the basic yellows. Check back with us soon for the rest! Thanks for reading!