A look at the Armada Defense Objective – Planetary Ion Canon

One of my favorite objectives in Armada has to be Planetary Ion Cannon. I’ve played it several times in standard games, and also played its Base Defense option in the Corellian Conflict three times back to back – and it has made me a believer! This objective comes in the Corellian Conflict expansion, so if you want to include it in your fleet, you’ll need to pick up a copy. And for that matter, if you haven’t picked up a copy yet, what are you waiting for? There are so many upgrades to your game in that box beyond running a campaign that it’s clearly an expansion everyone should be getting!
Lets look at this objective.

So what does that mean? It means you get to place 3 objectives on the map, and SHOOT using them, during the game! You get extra shots! One extra shot from each objective actually, but only once each turn, so you don’t want them all right next to each other. It helps to think of them as a sort of land mine – Your opponent may want to avoid them, or they may wish to plow right on through hoping to repair the damage before you add to it.
There are a couple of really significant aspects to this objective that many people might overlook on their first time using it, so I’ll walk you through the important parts first. First off, you deploy obstacles as usual. The setup for this objective starts after that – so you won’t get any setup advantage from this one. Next you are going to place three objective tokens beyond range 5 of both players’ edges. That much is easy enough, and you likely wouldn’t want them too close to each other. If your opponent’s ships are fast enough they could potentially fly right past your tokens and you’ll run the risk of forfeiting shots. You generally want to set up your obstacles in such a way that give your opponent one clear path to approach you, and that is the path where you will likely want to deploy your objective tokens. If your opponent decides to go the long way around, that will generally be their downfall, because they will either break up their formation, or have their fastest ships reach you first and allow you to cherry pick targets.
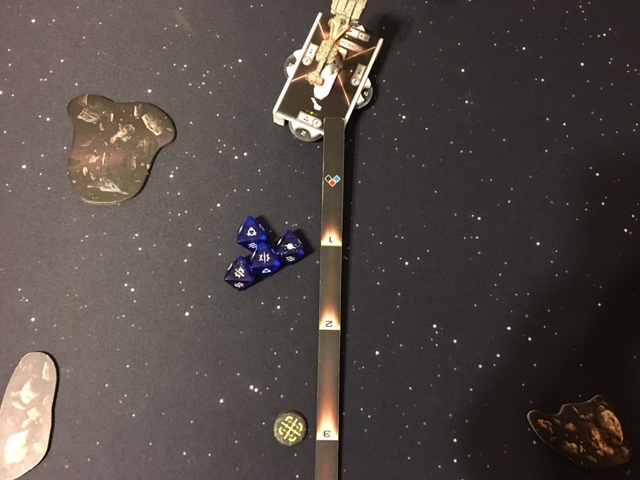
These tokens have a pretty large radius, being able to hit anything up to range 3 of them, and they can target ANY hull zone, which means even if your opponent’s Star Destroyer has it’s front hull zone barely in range 3, you can still target the rear hull zone when shooting! Additionally, while you can use the special blue crit effect listed on the card, you are also free to use the default crit instead. Many newer players read this and forget that you always have the default crit unless otherwise specified (A squadron without bomber, for example).
One general strategy when placing the objectives is to try to plan to destroy at least one ship using them. This may mean placing them in a path, so your first shot, and second shot will likely be able to hit the same target. And if you are lucky, then possibly even the third shot as well. This can mean placing all three objectives moderately close together, or it might mean spreading them apart, depending on the speed of the ship you are facing. A Victory Star Destroyer, for example will go slow enough that you would be able to place all 3 fairly close and get all three shots on the same target – however there is very little chance that these shots alone would be able to kill a Victory, so unless you are going to be able to combo these shots with a barrage or two from your fleet on the same target, you may want to try to cripple a weaker ship on it’s own and save the heavy ships for once your fleet is fully within firing distance. Which brings me to the two main placement options:
Placement option 1: Aggressive
An aggressive placement means trying to get shots on turns 1, 2, and 3. Generally, this will often end up giving your opponent the opportunity to repair any damage from the first attack or two before the rest of your fleet is in firing range, and can sometimes prove to be a complete waste of an objective if this is done. If you DO plan to place your ion tokens aggressively, generally you’ll want your opponents having deployed at very fast speeds, and to do so yourself, in hopes of shooting as early in the game as possible. An example might be if your opponent deploys several CR-90s at speed 4, and you have a Gladiator with Demolisher that may actually have a shot round 1.
Another aggressive strategy is to commit to a single ship each turn. If your opponent has a Nebulon-B for example, you can target it’s side and try to get critical damage through. Or perhaps you have General Dodonna and are fishing for a disabling crit early in the game. Sometimes an enemy fleet gets positioned so close together, that if you are able to reduce a ship’s speed by 1, you can cause everything to bump – and your opponent may not have a Nav command prepared for turn 1 if they expected to get shot.
Ultimately though, an aggressive placement is very risky because your opponent is likely to repair all damage before the real combat begins. Additionally, if your opponent has any squadrons with STRATEGIC, they will quickly be able to move your tokens out of the way and ruin your setup.
Placement option 2: Defensive
Defensive is typically the wiser strategy and the one I tend to use most of the time. Keep in mind that the 2nd player will be the winner if the game ends in a tie – so that means the 1st player has to come to you. With this knowledge you can set a trap that your opponent will be forced to walk into. I like to pick a section of the map that I’d like to concentrate on, usually the left or right corner, and set up obstacles blocking most of the ways in.
I will usually leave one single path into my area, and once the time comes to place Objective Tokens, I will put them into the path that I’ve laid out for my opponent. Now they can choose to come to me through the Ion Cannon, or come to me through the rocks. This is particularly effective at harming larger and slower ships, but agile ships like CR-90s can often “thread the needle” so to speak, and will still be able to get to you. However, if you are keeping your fleet fairly close together, you shouldn’t have any problems dealing with one or two CR-90s that approach your formation too early. It’s basically Divide and Conquer, for Star Wars Armada.
Regardless of which approach you decide, one thing you don’t want to do is spend one of your three shots on a ship that will simply repair all of the damage before you can continue to fire. If your opponent has built in shield recovery, like Redundant Shields or Projection Experts then you will not want to start shooting them on turn one, since in all likelihood they will fully repair all damage right the same turn. Don’t forget, your opponent does get to set dials after you place your tokens.
And lastly, you don’t always HAVE to shoot. You can maximize your advantage by waiting until the right opportunity to spend an objective token. Maybe you deploy your tokens fairly far forward, which prompts your opponent to start the game with an engineering command. If you opt NOT to fire, your opponent will be forced to take a token rather than repair the damage, and now you can fire the next turn when they have something less helpful queued up in their command dial.
But what if you are 1st player?
If you are the 1st player you might want to consider this one if you have a few squadrons with Strategic, as you can then move the objective tokens out of the way. You may also want to choose this objective if your fleet has mostly tough ships that can mitigate or recover the damage easily. Ships with Redundant Shielding, supporting ships with projection Experts, and Tarkin fleets handing out Engineering tokens (possibly Garm here as well) all will help minimize the impact from an aggressive 2nd player who might deploy these tokens close to your starting position. Additionally, if you have Mon Mothma you will be able to remove a die of your choice with an evade token, making the attack even weaker.
The GREEN Version In the Campaign!
The Corellian Co nflict has a Base Defense version of this map that is slightly different. I’m not going to talk about the Base Defense version too much other than to say that it plays differently, and if you haven’t played the campaign’s Green Version yet, you will want to re-read each card because of two primary differences. 1) You will have to deploy ALL of your forces first as second player, and 2) you DON’T pick up the tokens after you use them. (Yes that’s right the base defense version actually leaves the tokens on the map so you can fire from it multiple times! The campaign can be crazy that way!) This one is a great way to defend a base, especially against a superior force. I’ve used a fresh 400 point fleet to fend off a 500 point fleet attacking, and this was my all-star objective of choice. Try it and you won’t regret it!